Local Services in Texas

Month: October 2023 Page 1 of 7

Window Styles for Improved Ventilation in Kitchens and Bathrooms – NTHE Window Replacement Euless

As a homeowner who has experienced the challenges of maintaining proper ventilation in kitchens and bathrooms, I understand the vital role that windows play in enhancing air circulation and keeping these spaces comfortable and fresh.

The right window styles can significantly impact the efficiency of your ventilation system, and in this article, I’ll share my insights into the best window choices for these areas of your home based from Window Replacement Euless TX.

The Importance of Ventilation in Kitchens and Bathrooms

Kitchens and bathrooms are two of the most used and moisture-prone areas in any home. Proper ventilation is crucial to prevent issues such as mold growth, moisture damage, and unpleasant odors. Good ventilation also helps maintain air quality and comfort.

Windows are an essential component of a well-designed ventilation system. They allow fresh air to enter, while also enabling the escape of humid or odorous air. To achieve effective ventilation, it’s essential to select window styles that can facilitate this process.

Top Window Styles for Improved Ventilation

Let’s explore some of the best window styles for kitchens and bathrooms to enhance ventilation and keep these spaces fresh and comfortable.

1. Casement Windows

Casement windows are an excellent choice for kitchens and bathrooms when it comes to ventilation. These windows are hinged on one side and swing open like a door, creating a large opening for air circulation. When fully opened, casement windows allow maximum airflow, making them ideal for removing cooking odors, steam, and humidity in the kitchen.

Pros:

  • Maximum ventilation when fully open.
  • Strong, airtight seal when closed, preventing drafts and water infiltration.
  • Available in various sizes to fit your space.

Cons:

  • The swinging mechanism may require sufficient space to operate, which could limit placement options in some bathrooms.
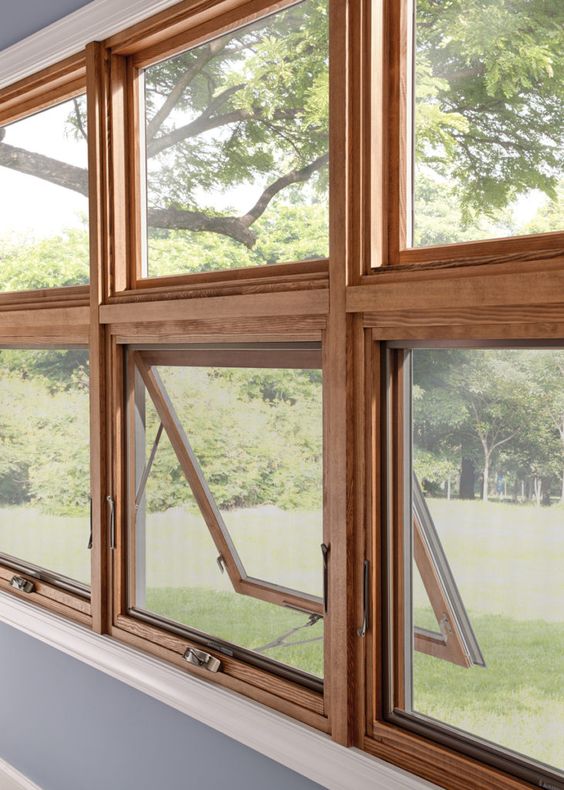
2. Awning Windows

Awning windows are hinged at the top and open outward from the bottom, resembling an awning. They are an excellent choice for kitchens and bathrooms where privacy is essential but ventilation is still needed. Awning windows can be opened slightly to allow fresh air in while maintaining privacy and blocking out rain.

Pros:

  • Effective at preventing rain from entering when partially open.
  • Allows for controlled ventilation.
  • Provides privacy, making them suitable for bathrooms.

Cons:

  • Limited maximum opening compared to casement windows.
  • May not offer as much airflow in larger spaces.

3. Slider Windows

Slider windows are another practical option for kitchens and bathrooms. These windows feature one or two sashes that slide horizontally along tracks. Slider windows allow for easy and controlled ventilation by opening one or both sashes partially. They are particularly useful in spaces where vertical clearance may be limited.

Pros:

  • Smooth and easy operation, making them user-friendly.
  • Suitable for smaller bathrooms and kitchens with limited space.
  • Provide flexibility in how much air you want to allow in.

Cons:

  • Limited maximum opening compared to casement or awning windows.
  • Airflow may be somewhat restricted compared to other window styles.

4. Hopper Windows

Hopper windows are hinged at the bottom and open inward from the top. These windows are ideal for basement kitchens or bathrooms where airflow is crucial. They create a funnel effect, allowing warm, stale air to rise and exit through the window while drawing in fresh air from outside.

Pros:

  • Effective for removing humid air and odors from confined spaces.
  • Good at preventing rain from entering when closed.
  • Suitable for privacy in basement bathrooms.

Cons:

  • Limited visibility due to the inward opening.
  • May not be as aesthetically pleasing as other window styles.

5. Jalousie Windows

Jalousie windows consist of multiple horizontal slats or glass louvers that can be opened and closed simultaneously. They offer a unique and charming look and can provide excellent ventilation in areas where privacy is not a primary concern.

Pros:

  • Each louver can be adjusted individually, allowing for precise control of ventilation.
  • Ideal for increasing airflow in kitchens or bathrooms with no privacy concerns.
  • Unique aesthetic appeal.

Cons:

  • Not as energy-efficient as other window styles when closed.
  • Louvers can accumulate dirt and require regular cleaning and maintenance.

6. Double-Hung Windows

While double-hung windows are more commonly associated with living rooms and bedrooms, they can also be a practical choice for bathrooms. They have two sashes that can be opened from both the top and bottom. Opening the top sash while keeping the bottom closed allows for controlled ventilation and privacy.

Pros:

  • Suitable for traditional home styles.
  • Offers both top and bottom ventilation options.
  • Allows for privacy while still allowing fresh air in.

Cons:

  • Limited ventilation when fully closed.
  • May not be the best option for kitchens that require maximum airflow.

Additional Considerations

When choosing the right window style for your kitchen or bathroom, consider the following factors:

  1. Privacy: Determine the level of privacy required for the space. Bathrooms, in particular, often need windows that offer privacy while still allowing ventilation.
  2. Maintenance: Consider the ease of cleaning and maintenance for the chosen window style. Some styles may have more crevices and moving parts that require attention.
  3. Aesthetic Match: Ensure that the chosen window style complements the overall design and aesthetics of your kitchen or bathroom.
  4. Local Climate: Take into account the climate of your area. For example, in a humid climate, a window that provides effective humidity control is essential.
  5. Energy Efficiency: Choose windows with good insulation properties to prevent energy loss.
  6. Local Building Codes: Check local building codes and regulations to ensure compliance with window requirements, especially in bathrooms.

Conclusion

Proper ventilation is essential in kitchens and bathrooms to maintain air quality, prevent moisture-related issues, and ensure overall comfort. Selecting the right window style can significantly impact the effectiveness of your ventilation system. Whether you opt for casement, awning, slider, hopper, jalousie, or double-hung windows, each style offers unique advantages that can meet your specific needs.

In my experience, according to Window Replacement Euless TX, I found that a combination of casement windows in the kitchen and awning windows in the bathroom provided an ideal balance of ventilation, privacy, and aesthetics. The choice ultimately depends on your individual preferences and requirements. With the right window style, you can enjoy well-ventilated, comfortable, and pleasant kitchen and bathroom spaces in your home.

NTHE Window Replacement Euless

3752 Trinity Hills Ln, Euless, TX 76040, United States

817-402-3539

How To Lock Garage Door Without Power – Keller Garage Door & Gate Repairs

Securing your Garage Door Repair Keller TX is a crucial aspect of home safety, particularly during emergencies or power outages.

In this comprehensive guide, we’ll explore various methods and strategies to effectively lock your garage door without relying on electrical power. These practical solutions ensure that your garage remains a secure space, providing peace of mind for you and your family.

1. Manual Locking Mechanism: Many garage doors are equipped with a manual locking mechanism. This can be a handle or knob located on the interior side of the door. Engaging this manual lock involves turning the handle or knob to secure the door in a closed position. Locate this mechanism and familiarize yourself with its operation for quick and effective use during power outages.

2. Slide Bolts and Bars: Install slide bolts or bars on the interior of your garage door to add an extra layer of security. These manual locking devices can be easily engaged to prevent the door from being opened. Strategically position them on both sides of the door to reinforce its resistance against external forces.

3. Padlocks and Hasps: Consider using padlocks and hasps as a versatile and effective solution for locking your garage door without power. Install a hasp on the door and attach a padlock through it to secure the door. Opt for high-quality padlocks with hardened shackles for increased durability and resistance to tampering.

4. C-Clamps: In the absence of specific locks, C-clamps can be a simple yet surprisingly effective solution. Place C-clamps on both sides of the garage door tracks to prevent the rollers from moving. This makeshift method helps secure the door without relying on power-operated mechanisms.

5. Deadbolt Locks: Install deadbolt locks on your garage door for enhanced security. Deadbolts provide a robust locking mechanism that can withstand external pressure. Choose deadbolt locks that can be operated manually, ensuring functionality without the need for electrical power.

6. Keyed Garage Door Handles: Upgrade your garage door handle to a keyed version. This integrated solution provides both a handle for manual operation and a key lock for added security. Follow the manufacturer’s instructions to replace the existing handle with the keyed version, allowing for convenient and secure access.

7. Garage Door Defender: Consider using a garage door defender, a physical barrier that prevents the garage door from being forcibly opened. Install this device on the interior side of the door to deter potential intruders from attempting to breach the door, especially during power outages.

8. Reinforce Windows: If your garage door has windows, reinforce them with security film or grilles. This extra layer of protection prevents intruders from easily breaking the windows to gain access to the garage. Reinforcing windows adds an additional security measure, even without electrical power.

9. Smart Locks with Battery Backup: Invest in smart locks equipped with battery backup capabilities. These locks can be operated manually and have a built-in battery to ensure continued functionality during power outages. Explore smart lock options that integrate with smart home platforms for added convenience.

10. Emergency Release Cord Security: Secure the emergency release cord of your automatic garage door opener. While designed for manual operation during power outages, this cord can pose a potential vulnerability. Use zip ties or a similar device to prevent unauthorized access to the emergency release mechanism.

11. Emergency Exit Door: If your garage has a separate emergency exit door, ensure it is properly locked and secured. This door can be an overlooked entry point, so maintaining its security is crucial, especially when power is unavailable.

12. Regular Maintenance: Incorporate regular maintenance into your garage door care routine. Lubricate manual locking mechanisms, check for loose bolts, and ensure that all security features are in good working condition. A well-maintained garage door is more reliable in providing security, especially during power outages.

13. Communication and Planning: Establish communication and a plan with household members regarding garage door security protocols during power outages. Ensure everyone is aware of manual locking procedures and emergency measures to maintain a coordinated approach to home security.

In conclusion, securing your Garage Door Repair Keller TX involves a combination of manual locking mechanisms, additional hardware, and strategic planning. By implementing these measures, you can enhance the security of your garage and, consequently, your entire home during power outages or emergencies. Always refer to the specific instructions provided by the lock or hardware manufacturer for proper installation and maintenance. If you have concerns about the security of your garage door, consider consulting with a professional locksmith for expert advice.

Keller Garage Door & Gate Repairs

1213 Hillside Dr, Keller, TX 76248, United States

1-817-769-3540

How Do I Get Another Garage Door Opener – Corinth Gates & Garage Doors

Getting another Corinth Garage Door Repair involves a series of steps to ensure you choose the right one for your needs, and that it’s compatible with your existing garage door system.

This comprehensive guide will walk you through the process, covering everything from identifying your current opener’s details to purchasing and installing a new one.

1. Identify Your Current Garage Door Opener:

The first step is to locate information about your current garage door opener. This can typically be found on the opener unit itself or in the user manual. Look for details such as the make and model, as well as any additional features or specifications.

2. Research and Compatibility:

Visit the manufacturer’s website to gather more information about your current garage door opener. Check for compatibility details, as some openers may work with specific models or brands. This information is crucial for ensuring that the new opener you choose will integrate seamlessly with your existing system.

3. Visit Authorized Dealers or Manufacturer’s Online Store:

Once you have the necessary details, visit authorized dealers or the manufacturer’s online store. Many reputable manufacturers have official websites where you can find product listings, specifications, and purchase options. Authorized dealers may also have physical stores where you can seek guidance from knowledgeable staff.

4. Explore Local Home Improvement Stores:

Major home improvement stores, such as Home Depot or Lowe’s, often carry a variety of garage door openers. Visit their websites or go to a local store to explore different models. Pay attention to product descriptions and specifications to find openers compatible with your garage door.

5. Check Customer Reviews:

Before making a final decision, read customer reviews for the specific garage door opener models you are considering. Real-world experiences can provide valuable insights into the performance, reliability, and ease of installation of different openers.

6. Compare Prices:

Prices for garage door openers can vary between retailers. Compare prices from different sources, both online and local stores. Take note of any ongoing promotions or discounts that may affect the overall cost.

7. Consider Professional Installation:

Evaluate whether you want to install the garage door opener yourself or hire a professional. While some people may opt for a DIY approach, others prefer the expertise of a professional installer. Factor in the cost of installation when budgeting for your new opener.

8. Warranty Considerations:

Check the warranty offered by the manufacturer. A longer warranty period is often an indicator of the product’s quality and the manufacturer’s confidence in its durability. Some retailers may also offer extended warranty options for additional peace of mind.

9. Purchase the Garage Door Opener:

Once you’ve chosen the right garage door opener for your needs, proceed with the purchase. Follow the ordering instructions on the manufacturer’s website or through the authorized dealer. If you’re buying from a physical store, check for any additional accessories or parts you may need.

10. Installation and Testing:

Follow the manufacturer’s installation instructions carefully. Whether you’re installing it yourself or having it professionally installed, make sure the opener is set up correctly. After installation, test the garage door opener to ensure it operates smoothly and troubleshoot any issues if necessary.

In summary, the process of getting another Corinth Garage Door Repair involves thorough research, consideration of compatibility, price comparison, and careful installation. By following these steps, you can confidently choose and install a garage door opener that meets your requirements.

Corinth Gates & Garage Doors

940-461-6990

Window Repair vs. Replacement: Knowing When to Choose Each – NTHE Window Replacement Trophy Club

As a homeowner, I’ve faced the inevitable question that many of us encounter – when should I repair my windows, and when is it time to replace them?

By following Window Replacement Trophy Club TX, I’ll share my experiences and insights into the delicate balance between window repair and replacement, helping you make informed decisions for your home.

The Dilemma of Window Issues

It all started with a few telltale signs. Drafts sneaking in, foggy glass, and stubborn frames that refused to open smoothly. My windows, which had once been a source of natural light and ventilation, were now a source of frustration. I had to decide whether it was time for window repair or if they needed to be replaced altogether.

When to Choose Window Repair

  1. Minor Damage: For minor issues like small cracks or scratches in the glass, window repair is a cost-effective solution. In my case, I had a couple of windows with scratches caused by the previous owner’s pets. A professional glass repair service quickly resolved these issues without the need for full replacements.
  2. Drafts and Air Leaks: If you’re experiencing drafts or air leaks, it doesn’t necessarily mean you need new windows. Often, these issues can be fixed by resealing or weatherstripping. I had a few windows that were letting in cold air during the winter. A bit of weatherstripping and resealing worked wonders, eliminating the drafts and improving energy efficiency.
  3. Functional Issues: When your windows are difficult to open or close, it may be a problem with the hardware, such as hinges or locks. Replacing these components is often all that’s required to restore functionality. This was the case with several of my older windows, and a few hardware replacements had them working like new.
  4. Cosmetic Concerns: If your windows have minor cosmetic issues like chipped paint or stained frames, a fresh coat of paint or refinishing can breathe new life into them. I chose to repaint some of my windows to enhance their appearance, and it made a significant difference.

When to Consider Window Replacement

  1. Significant Damage: If your windows have substantial damage, such as large cracks or shattered glass, it’s usually more cost-effective and safer to replace them entirely. I had a window with a large crack due to a fallen tree limb, and the only viable option was replacement.
  2. Energy Inefficiency: If your energy bills are skyrocketing due to poor insulation, it might be time to invest in energy-efficient windows. I noticed a considerable improvement in energy savings after replacing some of my older, single-pane windows with energy-efficient double-pane ones.
  3. Condensation Between Panes: Foggy or condensation-filled double-pane windows are a clear sign of a failed seal. Once the seal is compromised, the insulating properties are lost, leading to energy loss and reduced clarity. I encountered this issue with a few windows and chose to replace them to restore clarity and efficiency.
  4. Aesthetic Overhaul: Sometimes, you may want to update the appearance of your home. If your windows are outdated or don’t match your desired aesthetic, replacement can give your home a fresh, modern look. I decided to replace the windows in my living room to create a more contemporary feel.
  5. Structural Integrity: If your window frames are rotting or have significant structural issues, repair might not be sufficient to ensure your home’s safety and security. Replacing these windows is essential to maintain the structural integrity of your home. I had a couple of windows with severe frame damage, and replacement was the only safe option.

Choosing the Right Window Professional

Whether you opt for repair or replacement, choosing the right window professional is crucial. Here’s what I’ve learned:

  1. Get Multiple Quotes: Don’t hesitate to seek quotes from several window professionals. This allows you to compare costs and services to make an informed decision.
  2. Check References: Ask for references and reviews from past clients to gauge the professionalism and reliability of the service provider.
  3. Energy Efficiency: When replacing windows, consider energy-efficient options. Look for professionals who can provide guidance on the best energy-efficient windows for your home.
  4. Warranty: Inquire about warranties and guarantees offered by the window professional. A good warranty can provide peace of mind regarding the quality of the work.

Conclusion: A Home Renewed

Overall, based from Window Replacement Trophy Club TX and in my journey of dealing with window issues, I’ve come to understand that the choice between repair and replacement is not always straightforward. It requires careful consideration of factors like the extent of damage, energy efficiency, and your aesthetic preferences. Making informed decisions and working with experienced window professionals can rejuvenate your home, bringing back the comfort and beauty you deserve.

NTHE Window Replacement Trophy Club

2220 McLean Ave, Trophy Club, TX 76262, United States

817-592-8450

How To Change Liftmaster Garage Door Battery – Lantana Gates & Garage Doors

Changing the battery in your LiftMaster Garage Door Repair Lantana TX is a simple and essential maintenance task to ensure the reliable functioning of your garage door.

Follow these step-by-step instructions for a smooth battery replacement process.

: Preparation

Before you begin, gather the necessary materials:

  • A new battery compatible with your LiftMaster garage door opener.
  • A secure ladder to reach the motor unit.
  • A screwdriver, usually a Phillips-head, for removing the cover.

: Safety First

Always prioritize safety. Ensure that the garage door is closed to prevent any accidents. Additionally, disconnect the power supply to the garage door opener. This can be done by either unplugging it from the power outlet or turning off the circuit breaker dedicated to the garage door opener.

: Locate the Battery Compartment

Identify the battery compartment on the motor unit of your LiftMaster garage door opener. Typically, it is located on the back or side of the unit. Safely position the ladder to access the motor unit.

: Remove the Cover

Using the screwdriver, carefully remove the screws securing the cover of the battery compartment. Keep the screws in a safe place to avoid misplacement.

: Extract the Old Battery

With the cover removed, you will see the old battery. Gently disconnect it from the terminals. Take note of the battery’s orientation to ensure proper installation of the new one.

: Install the New Battery

Retrieve the new battery and connect it to the terminals in the same orientation as the old battery. Ensure a secure and snug connection to prevent any issues with the garage door opener’s operation.

: Replace the Cover

Once the new battery is securely in place, position the cover back onto the battery compartment. Use the previously removed screws to secure the cover tightly. Ensure that the cover is properly sealed to protect the battery.

Reconnect Power

Reestablish the power connection to the garage door opener. This can be done by either plugging it back into the power outlet or turning on the circuit breaker.

: Test the Garage Door Opener

To confirm the success of the battery replacement, test the garage door opener. Operate the door by opening and closing it to ensure smooth functionality.

: Properly Dispose of the Old Battery

Dispose of the old battery following local regulations and guidelines. Many areas have specific recycling programs for household batteries to minimize environmental impact.

You have completed the process of changing the battery in your LiftMaster Garage Door Repair Lantana TX. Regularly checking and replacing the battery when needed is crucial for maintaining the optimal performance of your garage door system.

Lantana Gates & Garage Doors

1180 Central Way, Lantana, TX 76226, United States

1-940-400-3038

How To Change Gear On Liftmaster Garage Door Opener – Garage Door Experts of Mansfield

Changing the gear on your LiftMaster Garage Door Repair Mansfield TX is a task that requires precision and attention to detail. It’s a practical and cost-effective solution to address issues like excessive noise or difficulty in opening and closing the garage door.

In this comprehensive guide, we’ll walk through the process step by step to ensure a successful gear replacement.

1. Safety First: Begin by prioritizing safety. Disconnect the power to the garage door opener to prevent any accidents during the gear replacement. This can typically be done by unplugging the unit or switching off the circuit breaker.

2. Locate the Motor Unit: Identify the main motor unit of your LiftMaster garage door opener. This is usually mounted on the ceiling in your garage.

3. Access the Gear Assembly: Find the cover or housing that protects the gear assembly within the motor unit. This cover is often secured with screws. Use a screwdriver to carefully remove these screws and take off the cover.

4. Inspect the Existing Gear: Once the cover is removed, inspect the existing gear. Look for signs of wear, cracks, or any damage. If the gear is in poor condition, it’s crucial to replace it to ensure the smooth operation of your garage door.

5. Disconnect Power: Ensure that the power is disconnected from the garage door opener. This step is vital for your safety while working on the gear assembly.

6. Remove the Old Gear: Use the appropriate tools, such as a wrench or nut driver, to carefully loosen and remove the bolts or screws securing the old gear. Take your time to avoid damaging any surrounding components. Once the fasteners are removed, take out the old gear.

7. Install the New Gear: Retrieve the replacement gear from your LiftMaster garage door opener gear kit. Align it correctly in the same position as the old gear and secure it in place by tightening the bolts or screws. Be cautious not to overtighten, as this may cause unnecessary stress on the gear.

8. Lubricate Moving Parts: As part of routine maintenance, apply a recommended garage door lubricant to the new gear and other moving parts. This helps reduce friction and ensures smooth operation.

9. Check for Additional Damage: While the unit is open, inspect other components for any visible damage. Address any issues you identify to prevent future problems and ensure the longevity of your garage door opener.

10. Reassemble the Unit: Place the cover back on the gear assembly and secure it with the screws you removed earlier. Ensure that it is tightly in place to protect the gear and other internal components.

11. Reconnect Power: Once the cover is secured, plug the garage door opener back in or turn on the circuit breaker to restore power to the unit.

12. Test the Garage Door: Operate the garage door opener and observe the door’s movement. Listen for any unusual noises and make sure the door opens and closes smoothly.

13. Adjustments and Fine-Tuning: Make any necessary adjustments to the gear or other components to ensure optimal performance. Refer to your LiftMaster user manual for specific instructions on fine-tuning.

14. Regular Maintenance: Establish a routine maintenance schedule for your garage door opener. This includes periodic lubrication and visual inspections to catch any issues early on.

By following these step-by-step instructions, you should be able to successfully change the gear on your LiftMaster Garage Door Repair Mansfield TX. If you encounter any challenges or if the problem persists, consider seeking professional assistance for further diagnosis and repair.

Mansfield Overhead & Garage Doors

2151 N Holland Rd, Mansfield, TX 76063, United States

1-817-769-2447

How To Change Garage Door Password – Plano Overhead & Garage Doors

Your Garage Door Repair Plano TX is more than just an entry point; it’s a gateway to your home. Unfortunately, many homeowners overlook the security implications of a weak or unchanged garage door password.

This seemingly insignificant detail can be the weak link that compromises the safety of your entire household.

Common Password Mistakes

Before diving into the process of changing your garage door password, let’s address some common mistakes people make. Using easily guessable passwords like birthdays or generic words not only puts your home at risk but also invites potential intruders.

Step-by-Step Guide on Changing Garage Door Password

Now, let’s get hands-on. Changing your garage door password doesn’t have to be a daunting task. Follow these simple steps to ensure your garage door remains a fortress:

  1. Locate the control panel on your garage door opener.
  2. Enter the current password to access the settings.
  3. Navigate to the password change option.
  4. Input a new, strong password.
  5. Confirm the new password.
  6. Save the changes and exit.

Choosing a Strong Password

Creating a robust password is crucial in fortifying your garage door’s security. Combine uppercase and lowercase letters, numbers, and symbols to make it complex yet memorable. Avoid using easily accessible information like your address or family names.

Utilizing Smart Technology for Enhanced Security

Consider upgrading to a smart garage door system. These advanced technologies not only provide convenient access but also offer additional layers of security. With features like remote monitoring and alerts, you can keep a vigilant eye on your garage’s security.

Benefits of Regular Password Updates

Frequently changing your garage door password is a proactive measure against potential threats. It prevents unauthorized access and ensures that your home remains a safe haven. Make it a habit to update your password at least every few months.

Troubleshooting Password Change Issues

Encountering problems during the password change process is not uncommon. If you face issues, such as the system not recognizing the new password, consult the user manual or contact customer support for guidance. Prompt resolution is key to maintaining a secure garage.

Importance of Garage Door Security in Home Safety

Your garage door is more than just a barrier for your car; it’s a line of defense for your home. Neglecting its security compromises the safety of everything inside. Take a moment to reflect on the interconnectedness of garage door security with the overall safety of your household.

Additional Security Measures

Enhance your garage door security by implementing additional measures. Consider installing alarms and monitoring systems that can alert you to any unusual activity. These supplementary measures act as a deterrent and provide an added layer of protection.

Educating Family Members

Security is a collective effort. Ensure that all family members are aware of the importance of garage door security. Establish a protocol for updating and safeguarding passwords, fostering a sense of shared responsibility for the safety of your home.

Case Studies

Real-life examples serve as powerful reminders of the consequences of lax garage door security. Stories of security breaches and their aftermath underscore the importance of taking proactive steps to prevent such incidents.

Future Trends in Garage Door Security

As technology evolves, so does garage door security. Stay informed about emerging trends, such as biometric access and artificial intelligence integration. These innovations promise to revolutionize home security, providing even greater protection.

Community Safety Initiatives

Extend your awareness beyond your home. Advocate for community initiatives that promote garage door security. A united effort ensures a safer neighborhood for everyone. Join hands with neighbors to create a collective shield against potential threats.

Conclusion:

In conclusion, the security of your Garage Door Repair Plano TX is not a matter to be taken lightly. By understanding the risks, adopting best practices, and staying informed about emerging technologies, you can fortify your home against potential threats. Remember, a secure garage door is a key element in maintaining a safe and protected living environment.

Plano Overhead & Garage Doors

972-640-7299

How To Add Keypad Garage Door Opener – Mckinney Overhead & Garage Doors

Adding a keypad Mckinney Garage Door Repair is a practical and convenient way to enhance the accessibility and security of your garage.

Whether you’re tired of fumbling for your remote control or you want to provide easy access to family members or guests, installing a keypad is a relatively simple DIY project. In this comprehensive guide, we’ll walk you through the process step by step.

: Selecting the Right Keypad

Before you start the installation process, it’s crucial to choose a keypad that is compatible with your garage door opener. Check the manufacturer’s recommendations and specifications to ensure a seamless integration.

: Gather Your Tools

To make the installation smoother, gather the necessary tools and equipment. You’ll likely need a screwdriver, a drill with bits, screws, and perhaps a level to ensure the keypad is mounted correctly.

: Locate the Control Box

Find the control box of your garage door opener. This is usually situated near the motor unit, either on the ceiling or the wall. If you’re unsure, consult your garage door opener manual.

: Identify Terminal Screws

Most garage door openers have terminal screws labeled with abbreviations such as “SRT,” “Common,” and “24V.” These are the terminals to which you’ll connect the wires from the keypad.

: Power Off the Garage Door Opener

For safety reasons, turn off the power to your garage door opener. This may involve unplugging it or switching off the circuit breaker that controls the garage.

: Mount the Keypad

Choose a suitable location for the keypad, ideally near the entrance to the garage. Use a level to ensure it’s mounted straight, and mark the positions for the screw holes. Securely attach the keypad to the wall using the provided screws.

: Open the Keypad Cover

Most keypads have a cover that needs to be opened to access the internal wiring terminals. Open the cover and take note of the color-coded or labeled wires.

: Connect the Wires

Connect the wires from the keypad to the corresponding terminal screws on the garage door opener’s control box. Match the colors or follow the labeling provided in the keypad’s instructions. This step establishes the electrical connection between the keypad and the opener.

: Program the Keypad

Refer to the keypad’s manual for instructions on programming. Typically, this involves entering a specific code or series of codes using the keypad buttons. Follow the instructions carefully to ensure proper programming.

: Power On the Garage Door Opener

Turn the power back on to your garage door opener. If you turned off the circuit breaker, switch it back on. The keypad should now be powered and ready for use.

: Test the Keypad

Enter the programmed code on the keypad and test whether it successfully opens and closes the garage door. This is a crucial step to ensure that the keypad is functioning correctly.

: Secure the Keypad

Once you’ve confirmed that the keypad is working as intended, secure the cover tightly. Check for any loose screws and make sure the keypad is securely mounted to the wall.

: Additional Security Measures

Consider changing the access code periodically for added security. Some keypads also have features such as temporary access codes for guests. Explore these options in the keypad’s manual and implement them as needed.

You have successfully added a keypad Mckinney Garage Door Repair to your garage. This not only provides a convenient way to access your garage but also enhances the overall security of your home. Regularly check the keypad for any signs of wear or malfunction, and follow the manufacturer’s recommendations for maintenance. Enjoy the added convenience and peace of mind that come with your new keypad garage door opener.

Mckinney Overhead & Garage Doors

3804 Landsdowne Dr, McKinney, TX 75072, United States

1-972-848-7414

How To Adjust A Belt Drive Garage Door Opener – Southlake Garage Door & Gate Repairs

Adjusting a belt drive Garage Door Repair Southlake TX is a task that requires precision and care to ensure the smooth and efficient operation of your garage door.

In this detailed guide, we’ll walk through the steps involved in adjusting a belt drive opener, covering key aspects such as tensioning the belt, aligning the components, and performing routine maintenance.

1. Safety Precautions: Before delving into adjustments, prioritize safety. Disconnect the power to the garage door opener to avoid any accidental activations. Additionally, ensure that the area around the garage door is clear of obstructions.

2. Identify the Issue: Begin by identifying the specific issue with your garage door opener. Is it making unusual noises, moving unevenly, or experiencing difficulty in opening or closing? Knowing the problem will help you target your adjustments effectively.

3. Inspect the Belt: Carefully inspect the belt for signs of wear, fraying, or damage. If you observe any issues, it may be necessary to replace the belt before proceeding with adjustments to ensure optimal performance.

4. Tension Adjustment: Most belt drive openers come equipped with a tension adjustment mechanism. Locate the tension adjustment nut, often found near the motor unit. Use a wrench to tighten or loosen the nut as needed, following the manufacturer’s guidelines. Adequate tension is crucial for proper functionality.

5. Align the Belt: Misalignment of the belt can lead to operational problems and increased wear. Check that the belt is correctly aligned on the pulley and sprocket. If misalignment is detected, adjust the pulley to ensure the belt runs smoothly without any twists or turns.

6. Verify Rail Stability: Examine the rail on which the opener travels. Ensure it is securely fastened to the ceiling and walls. Tighten any loose bolts or screws to enhance stability. A stable rail is essential for the smooth operation of the garage door.

7. Lubricate Moving Parts: Apply a silicone-based lubricant to the belt, pulley, and other moving parts. Regular lubrication reduces friction, minimizes wear and tear, and contributes to a quieter operation. Refer to the manufacturer’s recommendations for the appropriate type of lubricant.

8. Balance the Door: An unbalanced garage door can strain the opener. Disconnect the opener and manually open the door halfway. If it doesn’t stay in place, the door may be unbalanced. Adjust the tension on the springs or seek professional assistance for this critical task.

9. Adjust Downforce Settings: Modern garage door openers typically feature settings for downforce—the pressure applied when closing the door. Consult your opener’s manual to locate and adjust the downforce settings appropriately. This ensures the door closes securely without exerting excessive force.

10. Test the Door: After completing adjustments, reconnect the power and conduct thorough tests of the door’s operation. Observe for any unusual noises, jerky movements, or other signs of trouble. If issues persist, revisit the adjustments or consider seeking professional assistance.

11. Regular Maintenance: Establish a routine maintenance schedule to prevent future issues. Regularly inspect and lubricate all garage door and opener components, and tighten any loose hardware. This proactive approach contributes to the longevity of your garage door system.

Remember, if you encounter uncertainty or discomfort with any adjustments, it is advisable to consult a professional Garage Door Repair Southlake TX technician. Their expertise can ensure that your garage door opener functions optimally and safely.

Southlake Garage Door & Gate Repairs

817-587-0445

How to Choose the Right Hardwood Floor Stain Color? – Floor N More

When I decided to install hardwood floors in my home, one of the most exciting yet challenging aspects of the process was choosing the perfect stain color. The right stain can transform a room, adding warmth, character, and style. However, with a plethora of stain colors and shades to choose from, the decision can be overwhelming.

I’ll share my journey of selecting the ideal hardwood floor stain color, along with valuable insights and tips to help you make the right choice for your own space by following Floor N More Southlake.

1. Consider the Existing Décor and Style

The first step in choosing a hardwood floor stain color is to consider your home’s existing décor and style. Your floor should complement the overall aesthetic. Here are some guidelines for different design styles:

  • Traditional: If your home leans towards a traditional style, classic stains like warm browns, rich mahoganies, or dark cherry can create an elegant, timeless look.
  • Contemporary: For a more modern or minimalist style, light or medium stains, such as natural oak or ash, can create a clean and airy feel.
  • Rustic or Farmhouse: If you love the rustic or farmhouse style, you might opt for stains that enhance the wood’s natural grain and imperfections. Colors like antique browns or weathered grays can work well.
  • Eclectic: If your home has an eclectic mix of styles and colors, consider a neutral or medium stain that can blend with various design elements.

2. Determine Your Desired Mood

The stain color you choose can significantly affect the mood and atmosphere of a room. Think about the ambiance you want to create:

  • Warm and Cozy: Rich, dark stain colors like espresso or chestnut can make a room feel warm and cozy, ideal for bedrooms or living areas.
  • Airy and Bright: Lighter stains, such as natural, honey, or light ash, can make a space feel more open and bright, perfect for kitchens and dining rooms.
  • Timeless Elegance: Classic medium stains like walnut or cherry can exude an air of timeless elegance, suitable for formal dining rooms or entryways.
  • Serene and Relaxing: If you’re aiming for a serene and relaxing ambiance, consider cool, muted stains like gray or taupe.

3. Test Samples in Your Space

Once you’ve considered your existing décor and desired mood, it’s crucial to test stain samples in your space. The way a stain looks in the store or on a small sample can be quite different from how it appears on your entire floor.

  • Get Sample Boards: Purchase small samples or sample boards of the stain colors you’re interested in. Many flooring stores offer these at a low cost.
  • Place Samples in the Room: Place the sample boards in different areas of the room and observe how they look in various lighting conditions. Natural and artificial light can significantly affect the appearance of the stain.
  • Live with the Samples: Don’t rush the decision. Live with the samples for a few days or even a week to get a sense of how each color feels in your space.

4. Consider the Wood Species

The type of wood you have will also impact how stain colors appear. Different wood species have unique grain patterns, color undertones, and characteristics. For example:

  • Oak: Oak is a popular choice with a strong grain pattern and tends to take stains well. It works with a wide range of stain colors, from light to dark.
  • Maple: Maple is a harder wood with a less prominent grain. It’s best suited for lighter stains, as it can appear blotchy with dark stains.
  • Cherry: Cherry has a beautiful, fine grain and often looks best with medium to dark stains, bringing out its natural richness.
  • Walnut: Walnut has a deep, rich color and takes dark stains exceptionally well. It’s ideal for those who want a dark, luxurious look.

5. Balance with Wall Color

Your wall color plays a significant role in the overall appearance of your space. The right stain color should harmonize with the wall color. Here’s how to achieve a balanced look:

  • Complementary Colors: If you have light-colored walls, you can choose a stain color that complements them. Light walls can pair beautifully with medium to dark stains.
  • Monochromatic Look: For a cohesive, monochromatic look, consider staining your hardwood floors in a shade similar to your wall color. This can create a seamless, continuous flow.
  • Contrast: If you want to create contrast, opt for a stain color that contrasts with your wall color. Light walls with dark floors or vice versa can make a strong design statement.

6. Lighting Matters

Natural and artificial lighting can significantly impact the appearance of your hardwood floor stain color. Consider the following:

  • Natural Light: If your room gets plenty of natural light, the stain color may appear lighter and warmer. Take this into account when choosing a stain.
  • Artificial Light: The type and color of artificial lighting can also affect how the stain looks. Warmer lighting can make the stain color appear more red or yellow, while cooler lighting can make it seem grayer.
  • Consider Window Coverings: Window coverings, such as curtains or blinds, can filter natural light and create different effects. Keep these in mind when selecting a stain color.

7. Maintenance and Wear Considerations

Certain stain colors may be more forgiving when it comes to hiding wear and tear. Here are some points to consider:

  • Dark Stains: Dark stains can hide minor scratches and imperfections more effectively. However, they may show dust and pet hair more readily.
  • Light Stains: Lighter stains can help mask dust and pet hair but may reveal scratches more prominently.
  • Mid-Tone Stains: Medium-toned stains often strike a balance, hiding some wear while not exaggerating dust or scratches.

8. Personal Preferences

Ultimately, your personal preferences should guide your choice. The stain color you choose should be one that resonates with you and makes you feel at home. Consider what colors make you happy and create a space that you love to be in.

Conclusion

Based from Floor N More Southlake, selecting the right hardwood floor stain color is a crucial decision in the process of creating a beautiful and comfortable living space. It’s a choice that can have a significant impact on the overall look and feel of your home. By carefully considering your existing décor, desired mood, wood species, lighting, and personal preferences, you can make an informed decision that will enhance the beauty and character of your space. Take your time, explore different options, and enjoy the process of finding the perfect hardwood floor stain color that will make your home uniquely yours.

Floor N More

1621 E Southlake Blvd, Southlake, TX 76092, United States

817-310-6331

Page 1 of 7

Powered by WordPress & Theme by Anders Norén