Local Services in Texas

Month: January 2022

Why is My Garage Door Light Blinking and Won’t Close-Team Taylor Doors

There can be several reasons why your Garage Door Repair light is blinking and won’t close. In this response, I will explore some possible causes and troubleshooting steps you can take to resolve the issue.
Please note that this is a general guide and specific instructions may vary depending on the make and model of your garage door opener. It’s always recommended to consult the manufacturer’s manual or contact a professional if you are unsure or uncomfortable performing these tasks.

  1. Obstruction Detection: Modern garage door openers are equipped with sensors that detect objects in the door’s path. If the sensors detect an obstruction, the door will not close and the light might blink. Inspect the area around the door and make sure there are no objects blocking the sensors. Additionally, check if the sensors are properly aligned. They should have a clear line of sight with no obstructions.
  2. Power Interruption: A power interruption can cause the garage door opener to malfunction. Check if the opener is receiving power by ensuring it is plugged in securely. If it is, check the circuit breaker or fuse that controls the garage door opener to see if it has tripped or blown. If necessary, reset the breaker or replace the fuse.
  3. Sensor Malfunction: If the sensors are clean, aligned, and unobstructed but the problem persists, they may be malfunctioning. Inspect the sensors for any visible damage or loose wiring. If you notice any issues, contact a professional to repair or replace the sensors.
  4. Remote Control Issues: Sometimes, problems with the remote control can prevent the garage door from closing properly. Check if the batteries in the remote are working and properly inserted. If the remote has a programming feature, try reprogramming it according to the manufacturer’s instructions. You can also try using a different remote control if available to determine if the issue lies with the remote itself.
  5. Opener Limits: Garage door openers have adjustable travel and force limits to ensure safe and proper operation. If these limits are not set correctly, it can cause the door to stop and the light to blink. Consult your garage door opener’s manual for instructions on adjusting the travel and force limits. Make small adjustments and test the door’s operation after each change until the issue is resolved.
  6. Manual Lock: Some garage doors have a manual lock feature that prevents the door from opening or closing automatically. If your door has a manual lock, ensure that it is disengaged or unlocked. Attempting to close the door while the lock is engaged can cause the light to blink and the door to stop.
  7. Motor or Gear Issues: If none of the above steps resolve the issue, there may be a problem with the garage door opener’s motor or gears. Over time, the motor or gears can wear out or become damaged, causing the door to stop and the light to blink. In such cases, it is advisable to contact a professional garage door technician to diagnose and repair the problem.

Remember, Garage Door Repair can be heavy and potentially dangerous if not handled properly. If you are unsure about any of the troubleshooting steps or feel uncomfortable performing them, it is best to seek professional assistance to avoid accidents and further damage to the door or opener.

Team Taylor Doors

210 SW Market St Suite 144, Lee’s Summit, MO 64063

1-816-408-6999

The New Design of Garage Floor-The Garage Floor Company

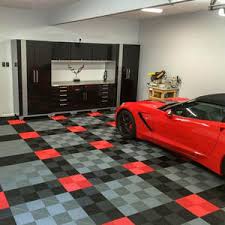
A Epoxy Garage Floor is an integral part of any home, serving as a functional space for parking vehicles, storing tools, and engaging in various activities. Over the years, garage floors have evolved from being purely utilitarian to becoming a space that blends functionality with aesthetics.

In this article, we will explore the new design trends for garage floors, focusing on innovative materials, finishes, and layouts that can transform this often overlooked space into a visually appealing and highly functional area.

  1. Material Selection: Traditionally, garage floors were constructed using plain concrete, which offered durability but lacked visual appeal. However, recent advancements in flooring materials have provided homeowners with a wide range of options to choose from. One popular choice is epoxy flooring, a seamless and glossy surface that not only enhances the aesthetics of the garage but also provides excellent resistance to stains, chemicals, and wear. Other materials like porcelain tiles, rubber flooring, and stained concrete are also gaining popularity due to their durability and customizable design options.
  2. Decorative Finishes: Gone are the days when garage floors were restricted to a simple gray or plain look. Modern garage designs embrace decorative finishes to add personality and style. Metallic epoxy coatings create a stunning, high-gloss finish with unique patterns and colors, mimicking the appearance of luxurious materials like marble or granite. Stenciled or stamped concrete is another option that allows homeowners to add intricate designs, logos, or patterns to the floor surface. These decorative finishes not only make the garage floor visually appealing but also turn it into a conversation piece.
  3. Color Schemes: Garage floors are no longer limited to dull and monotonous colors. The new design trends encourage the use of vibrant and contrasting color schemes to create an inviting and dynamic space. Bright colors like red, blue, or green can add a playful touch to the garage, while neutral tones such as gray or beige provide a sleek and modern look. Homeowners can choose colors that complement the overall design of their home or use contrasting hues to make the garage floor stand out as a unique feature.
  4. Lighting: Proper lighting is crucial for any functional space, and garages are no exception. Thoughtful lighting design can enhance the overall ambiance of the garage and make it more visually appealing. Incorporating overhead lighting fixtures, LED strips, or spotlights can illuminate specific areas, such as workstations or storage spaces, while accentuating the design elements of the floor. Smart lighting systems with adjustable brightness and color options are gaining popularity, allowing homeowners to customize the garage’s lighting according to their needs and preferences.
  5. Organization and Layout: An organized garage not only improves functionality but also enhances the visual appeal. Innovative storage solutions, such as wall-mounted cabinets, pegboards, and overhead racks, can keep tools, equipment, and other items neatly organized, making the garage appear clean and spacious. Additionally, creating designated zones for different activities, such as parking, workshop, or storage, helps optimize the garage space and ensures efficient use of the floor area.

Conclusion: The new design trends for Epoxy Garage Floor have revolutionized this once-neglected space into a stylish and functional part of the home. With a wide range of materials, finishes, and layouts to choose from, homeowners can now transform their garage floors into visually appealing areas that reflect their personal style. Whether it’s using decorative finishes, incorporating vibrant color schemes, or optimizing lighting and organization, the new design options allow for endless possibilities in creating a garage floor that goes beyond its utilitarian purpose.

The Garage Floor Company

866-507-0096

How to Fix Garage Door Opener-MF Solutions, Inc

A malfunctioning Garage Door Repair opener can be frustrating and inconvenient. However, with some basic troubleshooting and a few simple steps, you can often fix the issue yourself.

In this guide, we will walk you through the process of fixing common problems with garage door openers. It is important to note that safety should always be a priority when working on garage doors, so make sure to follow the manufacturer’s instructions and take necessary precautions.

  1. Identify the Problem: The first step in fixing a garage door opener is to identify the problem. Common issues include the door not responding to the remote or wall switch, the motor running but the door not moving, or the door reversing after hitting the floor. By understanding the symptoms, you can narrow down the potential causes and find an appropriate solution.
  2. Check Power and Connections: Ensure that the garage door opener is properly connected to a power source. Check if the outlet is functional and the cord is securely plugged in. If the opener has a battery backup, make sure the battery is fully charged. Additionally, inspect the wiring connections for any loose or damaged wires and tighten or replace them if necessary.
  3. Inspect the Remote Control: If the door doesn’t respond to the remote control, start by replacing the batteries. Clean the battery contacts and ensure they are making good contact with the batteries. If the issue persists, try reprogramming the remote according to the manufacturer’s instructions. If none of these steps work, it might be a problem with the remote itself, and you may need to replace it.
  4. Adjust the Safety Sensors: Garage door openers are equipped with safety sensors that prevent the door from closing if an object is in the way. If the door doesn’t close completely or reverses immediately after hitting the floor, check the alignment and cleanliness of the sensors. Make sure nothing is obstructing the sensor’s path and that they are facing each other. Clean the lenses with a soft cloth and adjust their positions until the indicator lights are aligned.
  5. Lubricate Moving Parts: Garage doors have several moving parts that require regular lubrication to operate smoothly. Apply a silicone-based lubricant to the rollers, hinges, and tracks to reduce friction. Avoid using oil-based lubricants as they can attract dirt and grime, causing more problems in the long run.
  6. Check the Trolley and Drive Belt/Chain: If the motor runs but the door doesn’t move, the problem could lie with the trolley or the drive belt/chain. Inspect the trolley for any obstructions or debris that may prevent it from engaging with the drive mechanism. If the trolley appears fine, check the drive belt/chain for signs of damage, such as fraying or excessive slack. Tighten or replace the belt/chain as necessary.
  7. Reset the Opener: Sometimes, resetting the garage door opener can resolve minor issues. Consult the manufacturer’s manual to find the reset procedure specific to your model. Typically, it involves disconnecting the power for a few minutes and then reconnecting it to reset the opener’s internal settings.
  8. Seek Professional Help: If you have followed all the steps mentioned above and the problem persists, it may be time to contact a professional garage door technician. They have the expertise and specialized tools to diagnose and fix complex issues safely.

Conclusion: Fixing a Garage Door Repair opener can often be done with a few basic troubleshooting steps. By identifying the problem, checking power and connections, inspecting the remote control, adjusting the safety sensors, lubricating moving parts, examining the trolley and drive belt/chain, and considering a reset, you can often restore your garage door opener’s functionality. Remember to prioritize safety, consult the manufacturer’s instructions, and seek professional help if needed. With these guidelines, you can save time and money by resolving common garage door opener problems on your own.

MF Solutions, Inc

9118 Elmwood Dr, Niles, IL 60714

302 Cherrywood Rd Buffalo Grove, IL 60089

224-434-1780

How to Manually Close Garage Door-Dynamo Overhead Garage Doors

Closing a Garage Door Repair Services manually is an essential skill to have in case of power outages or mechanical failures. While most garage doors are equipped with an automatic opener, understanding the manual operation method ensures that you can still secure your garage and protect your belongings.

In this guide, we will provide a step-by-step explanation on how to manually close a garage door.

Before We Begin: Before attempting to close your garage door manually, it is crucial to ensure your safety and the safety of others. Follow these precautions:

  1. Ensure there are no objects or obstructions in the garage door’s path.
  2. Keep children and pets away from the door while you are operating it manually.
  3. Familiarize yourself with the components of your garage door system, including the emergency release cord, springs, and track.

Step 1: Identify the Emergency Release Cord: The emergency release cord is a red rope or handle hanging from the garage door opener rail. It is usually located near the center of the garage door or on the side. Locate and grasp the emergency release cord firmly.

Step 2: Disengage the Garage Door Opener: Gently pull down on the emergency release cord to disengage the garage door opener mechanism. This action separates the opener from the door, allowing you to operate it manually.

Step 3: Check the Balance and Ease of Movement: Manually lift the garage door about halfway and release it. A properly balanced door should remain in place. If the door falls or rises, it may indicate a balance issue that requires professional attention. Additionally, ensure the door moves smoothly along the tracks without any resistance.

Step 4: Secure the Door: To prevent the door from reopening unexpectedly, secure it using a locking mechanism, if available. Some doors have built-in locks, while others may require using a padlock or bolt to secure the door in the closed position. Consult your garage door’s manual for specific instructions on locking mechanisms.

Step 5: Close the Garage Door: Position yourself at the bottom of the door, firmly grasp it with both hands, and lift it while applying even pressure. Be mindful of the weight of the door, as it can be heavy. Use your legs to provide strength while lifting. Continue lifting until the door is fully closed.

Step 6: Verify the Door’s Closure: Inspect the bottom of the door and ensure that it is securely closed against the ground. Check the sides and top of the door as well to make sure it is aligned correctly.

Step 7: Reengage the Garage Door Opener: Once power is restored or the issue is resolved, you will need to reengage the garage door opener. To do so, simply pull the emergency release cord towards the opener rail until you hear a clicking sound. This signifies that the opener is reconnected to the door.

Conclusion: Knowing how to manually close your Garage Door Repair Services is a valuable skill that ensures you can secure your garage and protect your belongings during power outages or when the automatic opener malfunctions. Remember to follow the safety precautions outlined in this guide and consult your garage door’s manual for any specific instructions. With these steps in mind, you can confidently handle manual operation and keep your garage secure.

Dynamo Overhead Garage Doors

Based in Conroe, TX

1-832-270-3373

How to Improve Garage Door Security-CCM Overhead Doors

Garage Door Repair security is a crucial aspect of overall home safety. Given that garages often house valuable possessions like vehicles, tools, and equipment, it’s essential to take proactive measures to protect them from theft and unauthorized access.

In this guide, we will discuss various ways to improve garage door security effectively. By implementing these measures, you can enhance the safety of your garage and provide peace of mind for yourself and your family.

  1. Invest in a High-Quality Garage Door: Start by ensuring that your garage door is made of sturdy materials such as steel or solid wood. These materials offer better resistance to forced entry compared to lightweight alternatives like aluminum or hollow-core doors. Additionally, consider choosing a door with reinforced panels and secure locks. Consult with a professional garage door installer to determine the most secure option that suits your budget and requirements.
  2. Install a Garage Door Opener with Rolling Code Technology: A rolling code technology-based opener enhances security by generating a new access code each time the door is operated. This prevents hackers from intercepting the code and gaining unauthorized access. Ensure your opener has this feature and periodically change the access code to minimize the risk of code theft.
  3. Strengthen Door Hardware: Reinforce the weak points of your garage door by upgrading the hardware. Install heavy-duty metal plates or bars to reinforce the area surrounding the lock. Additionally, use longer screws to secure hinges, strike plates, and other components, making it harder for burglars to force the door open.
  4. Install Security Cameras and Motion Sensor Lights: Installing security cameras and motion sensor lights in and around your garage is an effective deterrent against burglars. Visible cameras act as a deterrent, while motion sensor lights illuminate the area when someone approaches, discouraging unauthorized individuals from attempting a break-in. Ensure the cameras cover all entry points and use a surveillance system that allows remote monitoring.
  5. Implement a Garage Door Alarm System: Consider installing an alarm system specifically designed for garage doors. These systems can detect forced entry attempts, unauthorized tampering, or unusual vibrations. When triggered, they emit a loud sound, alerting you and nearby neighbors to the potential threat. Some advanced systems can also send alerts to your smartphone, allowing you to take immediate action.
  6. Reinforce Windows and Use Window Treatments: Garage door windows are vulnerable points that burglars can exploit. Reinforce the windows by adding security film, shatterproof glass, or window bars. Alternatively, use window treatments like curtains or blinds to prevent outsiders from seeing the contents of your garage, reducing the appeal for potential burglars.
  7. Secure Side and Back Doors: While focusing on the garage door itself, don’t overlook the security of side and back doors that provide access to the garage. Install solid doors made of robust materials, reinforce the frames, and use high-quality deadbolts or smart locks. Ensure these doors are well-lit and visible from the street to deter intruders.
  8. Practice Good Security Habits: No matter how secure your garage door is, it’s important to practice good security habits. Always lock your garage door when not in use, even if you’re at home. Keep the garage door opener remote out of sight and consider using a keychain remote instead of leaving it in your vehicle. Additionally, avoid leaving valuable items in plain sight within the garage, as this can attract unwanted attention.

Conclusion: By implementing these security measures, you can significantly improve the safety and security of your Garage Door Repair. Remember that no security system is entirely foolproof, but taking these steps will greatly reduce the risk of burglary and unauthorized access. Stay vigilant, maintain good security practices, and consult with professionals for expert advice to ensure your garage remains a safe and secure space for your belongings.

CCM Overhead Doors

1000 NW 80th St, Oklahoma City, OK 73114, United States

1-405-563-8982

How Long do Automatic Garage Door Openers Last-Denzel’s Garage Doors

Automatic Garage Door Repair openers are convenient devices that provide easy access to your garage without the need to manually open and close the door. They consist of various mechanical and electrical components that work together to facilitate smooth operation. While the lifespan of a garage door opener can vary depending on several factors, including usage, maintenance, and quality of the product, the average lifespan of an automatic garage door opener ranges between 10 to 15 years.

One of the primary factors that determine the longevity of a garage door opener is its quality and durability. Higher-end models typically incorporate sturdier materials and better craftsmanship, which can contribute to a longer lifespan. Cheaper, low-quality openers may wear out more quickly and require more frequent repairs or replacements.

The frequency of use also affects the lifespan of an automatic garage door opener. If you frequently open and close your garage door, the opener’s components, such as the motor and gears, will experience more wear and tear. On the other hand, if you use the garage door sparingly, the opener is likely to last longer.

Regular maintenance plays a vital role in extending the lifespan of an automatic garage door opener. It is essential to keep the opener clean and free from debris. Lubricating the moving parts, such as the hinges, rollers, and tracks, on a regular basis can help reduce friction and prevent premature wear. Additionally, inspecting the opener’s components periodically and addressing any issues promptly can prevent minor problems from escalating into major failures.

Environmental factors can also impact the lifespan of a garage door opener. Extreme temperatures, excessive humidity, and exposure to harsh elements can accelerate the deterioration of the opener’s components. If your garage is not well-insulated and experiences extreme temperature fluctuations, it can put additional strain on the opener and reduce its lifespan.

The technological advancements in garage door openers can influence their lifespan as well. Older models may lack the safety features and efficiency found in newer models. Upgrading to a more advanced opener with features such as rolling code technology and infrared sensors can improve the overall performance and extend the lifespan of the device.

In conclusion, the average lifespan of an automatic Garage Door Repair opener is around 10 to 15 years. However, several factors, including quality, frequency of use, maintenance, environmental conditions, and technological advancements, can affect the longevity of the opener. By investing in a high-quality opener, performing regular maintenance, and considering environmental factors, you can maximize the lifespan of your automatic garage door opener and enjoy its convenience for years to come.

Denzel’s Grage Doors

Marina Del Ray

619-496-9419

Why is My Garage Door Light Blinking-Affordable Garage Door

A blinking Garage Door Repair light can indicate various issues or malfunctions within the garage door system.

Below are some possible reasons why your garage door light might be blinking:

  1. Sensor misalignment: Most modern garage doors are equipped with safety sensors that detect obstructions in the door’s path. If these sensors become misaligned, it can trigger the blinking light as a safety precaution. Check if there is anything obstructing the sensors and ensure they are properly aligned.
  2. Sensor obstruction: Sometimes, dirt, dust, or debris can accumulate on the sensors, hindering their proper functioning. Clean the sensors using a soft cloth and ensure they are free from any obstructions.
  3. Power disruption: A blinking light could indicate a power interruption or a problem with the electrical supply to the garage door opener. Check if the opener is properly connected to a power source, and if necessary, try resetting the circuit breaker or replacing any blown fuses.
  4. Faulty light bulb or socket: The blinking light could be a result of a defective light bulb or a loose connection in the socket. Replace the bulb with a new one and ensure it is securely screwed into the socket.
  5. Wiring issues: Faulty or damaged wiring can cause the garage door light to blink. Inspect the wiring connections, looking for any signs of fraying, loose connections, or exposed wires. If you notice any issues, it’s recommended to consult a professional electrician to handle the repairs.
  6. Remote control interference: Interference from other devices operating on similar frequencies can disrupt the communication between the remote control and the garage door opener. Try reprogramming the remote control or changing its batteries to see if that resolves the issue.
  7. Faulty circuit board: If none of the above solutions work, it’s possible that there is a problem with the circuit board of the garage door opener. A malfunctioning circuit board can cause erratic behavior, including a blinking light. In such cases, it’s advisable to contact a professional garage door technician to diagnose and repair the issue.

Remember, this list provides some common reasons for a blinking Garage Door Repair light, but it’s important to consult the user manual or seek professional assistance specific to your garage door model for a more accurate diagnosis and appropriate troubleshooting steps.

Affordable Garage Door

Indianapolis, IN

1-317-372-5337

Powered by WordPress & Theme by Anders Norén