Local Services in Texas

Month: December 2022

Three Ways making your Epoxy Flooring Look Brand New

Epoxy Garage Flooring Phoenix AZ

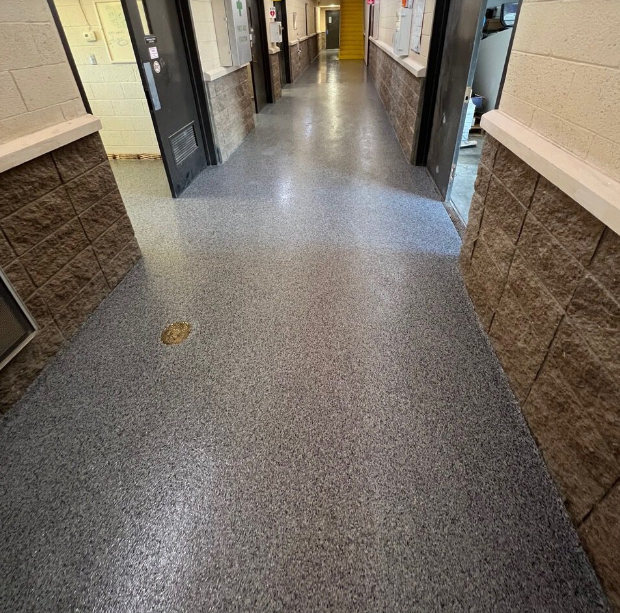
Making Your Epoxy Flooring Look Brand New

Flooring is a once-in-a-lifetime affair and therefore it is feasible to choose the most durable option for it. The choice of Epoxy flooring provides you with the option of industrial grade flooring and it is also easy to maintain, which saves you from the hassles and expenses in the long run. Finding a supplier for epoxy floor coatings is not a difficult task, yet finding the right service provider is a little challenging job. Another thing you should know is what the correct procedure is for using the floor or what care can prevent it from looking old and worn. If you need our help at Epoxy Garage Flooring Phoenix AZ contact us now!

Some of the things that you can do to make your epoxy coating look like new even after using it for a substantial period are as follows:

Mind the Regular Maintenance:

The best part of having Epoxy coatings on your floor is that they are easy to clean. It is possible to keep the shine intact and make them look nice with the help of minor routine cleaning. Any kind of spill can be cleaned using a paper towel or a soft cloth. The dust or debris can be removed with the help of a vacuum cleaner. For daily cleaning, a broom or mop is sufficient, though the bristle or fabric should be soft to avoid any kind of scratch. It is better to take routine measures for Epoxy floor coatings than accumulate the mess and invest a fortune in cleaning or renovating periodically.

Take Precautions against Damage

Along with day-to-day care, epoxy floor coatings need some prevention, so that serious damage does not occur. It is important to attend to the stubborn stains before they leave a permanent mark on your floor. A solution of water with ammonia can prove to be helpful in getting rid of tough stains. Try using hot water with a non-abrasive cleaner or scrubber while avoiding the use of any kind of soap or acid-based chemical solutions. This is about cleaning, but another far possibility that may permanently damage the epoxy floor is the scratch. Although the chances are rare, it is important to place kickstands, and legs of furniture with protective pads.

Take the Help of Professionals

Sometimes despite all carefulness, you see your floor losing its aesthetic charm. This is where you realize the importance of a professional that offers services for epoxy floor coatings. They have access to all the latest tools and techniques that help them in giving efficient results quickly, unlike us. They can also provide us with better colors, and finishes of floor coatings that allow less visibility of dirt and stains, as well as, making them resistant to external harming elements.

Be it mechanical workshops or hospitality structures, food or healthcare, epoxy floor coatings find application in a range of buildings. This versatile, convenient-to-maintain, and resilient flooring solution is distinctive due to its aesthetic appeal combined with usefulness. However, you cannot escape some basic caring duties, if you want to extract the maximum benefit from them.

How to Align Garage Door Tracks – Southern Home Creations Garage Doors & Openers

Aligning garage door tracks is a crucial step in maintaining the smooth operation of your garage door. Misaligned tracks can cause the door to become stuck or operate unevenly.

Here’s how I approached the process step by step according to Garage Door Repair:

First, I gathered all the necessary tools and equipment for the task. I made sure to have a ladder, a level, a rubber mallet, a wrench, a screwdriver, and safety glasses. These tools would help me assess the alignment and make the required adjustments.

Next, I inspected the tracks thoroughly to identify any visible damage or obstructions. I looked for dents, bends, or any debris that might be causing the misalignment. If I noticed significant damage, I knew it was best to seek professional assistance to repair or replace the tracks.

To begin aligning the tracks, I loosened the track brackets that hold the tracks to the wall or ceiling. Using a wrench or screwdriver, I carefully loosened the bolts or screws that secure the brackets. It was important not to remove them completely; just loosening them enough to allow movement was sufficient.

After loosening the track brackets, I focused on checking the vertical alignment of the tracks. I placed a level vertically against the inside edge of one track and observed if it was perfectly plumb or if it leaned inwards or outwards. I repeated this process for the other track as well. If I noticed any misalignment, it was time to make adjustments.

To align the tracks vertically, I used a rubber mallet to gently tap the bottom of the misaligned track. I tapped in the direction needed to correct the misalignment, making sure not to use excessive force. I continued tapping and checking the level until the track was perfectly plumb.

Once the vertical alignment was addressed, I moved on to checking the horizontal alignment of the tracks. Placing the level horizontally on the inside edge of each track, I observed if they were parallel to each other. If I noticed any deviation from parallel, it was time to make further adjustments.

To align the tracks horizontally, I used the level as a guide. Using a rubber mallet, I gently tapped the track brackets to move them slightly in the desired direction. It was important to tap lightly and gradually, checking the level frequently to ensure the tracks were parallel to each other.

After making the necessary adjustments, I verified the alignment of the tracks using the level. I ensured that both tracks were plumb vertically and parallel to each other horizontally. If further adjustments were needed, I repeated the previous steps until the alignment was correct.

Once I was satisfied with the alignment, it was time to tighten the track brackets. I used a wrench or screwdriver to securely tighten the bolts or screws on the track brackets. It was important to make sure they were tightened adequately to hold the tracks in place.

To ensure the effectiveness of the alignment, I tested the operation of the garage door. I opened and closed the door several times to observe its movement along the tracks. I listened for any unusual noises or resistance that might indicate a need for further adjustments.

In order to maintain the alignment of the garage door tracks, I established a regular maintenance routine. This included periodic inspections of the tracks for any signs of misalignment or damage. I also made sure to clean the tracks and remove any debris that could affect their operation. Additionally, lubricating the tracks and rollers as recommended by the manufacturer helped to keep them in good condition.

Remember, as stated in Garage Door Repair, while aligning the tracks of a garage door can be a DIY task, it’s important to prioritize safety. If you encounter significant alignment issues or feel unsure about the process, it’s best to consult a professional garage door technician. They have the expertise and experience to ensure proper alignment and safe operation of your garage door.

Southern Home Creations Garage Doors & Openers

4110 Tench Rd Suite D, Suwanee, GA 30024, United States

770-831-0301

How to Adjust Garage Door Opener – First Responder Garage Doors

Here’s a detailed guide on how to adjust a garage door opener. Please note that working with a garage door opener involves electrical components, so it’s important to follow safety precautions and consult the manufacturer’s instructions for your specific model. If you’re not comfortable or confident with the process, it’s best to hire a professional technician to handle the adjustment.

Here’s a step-by-step guide from Garage Door Repair Services on how to adjust a garage door opener based on my personal experience:

  1. Ensure Safety Precautions: Before starting any adjustment, it’s crucial to prioritize safety. Disconnect the power to the garage door opener by unplugging it or turning off the circuit breaker. Also, make sure the door is fully closed and the manual release handle is disengaged.
  2. Identify the Adjustment Points: Every garage door opener has adjustment points that control various aspects of the door’s operation. Typically, you’ll find three main adjustment screws: the close limit adjustment screw, the open limit adjustment screw, and the force adjustment screw.
  3. Adjusting the Close Limit: Locate the close limit adjustment screw, which determines how far the door closes. Using a screwdriver, turn the screw clockwise to decrease the close travel distance or counterclockwise to increase it. Make small adjustments, test the door, and repeat until the door closes to the desired position.
  4. Adjusting the Open Limit: Locate the open limit adjustment screw, which determines how far the door opens. Use a screwdriver to turn the screw clockwise to decrease the open travel distance or counterclockwise to increase it. Again, make small adjustments, test the door, and repeat until the door opens to the desired position.
  5. Adjusting the Force: Find the force adjustment screw, which controls the force required to operate the garage door. Use a screwdriver to turn the screw clockwise to increase the force or counterclockwise to decrease it. Make small adjustments, test the door’s operation, and repeat until the door moves smoothly without excessive force.
  6. Adjusting the Travel Limits: Some garage door openers have separate screws to adjust the travel limits. Consult the manufacturer’s instructions to locate and adjust these screws. Typically, you’ll find two screws, one for the up limit and one for the down limit. Use a screwdriver to make small adjustments, test the door, and repeat until the door stops and reverses at the desired points.
  7. Check and Adjust the Safety Sensors: If your garage door opener has safety sensors, ensure they are properly aligned. Clean the sensors and check for any obstructions that might interfere with their operation. Adjust the sensors by gently moving them until the indicator lights are aligned and not blinking.
  8. Test the Door: After making the necessary adjustments, reconnect the power to the garage door opener. Stand clear of the door’s path and test the opening and closing operation. Pay attention to any unusual noises, jerky movements, or resistance. If needed, fine-tune the adjustments until the door operates smoothly and safely.
  9. Ongoing Maintenance: To keep your garage door opener in good working condition, perform regular maintenance tasks. This includes lubricating the moving parts according to the manufacturer’s instructions, tightening screws and bolts, and inspecting cables and springs for signs of wear or damage. Following a maintenance schedule will help prolong the lifespan of your garage door opener.

Remember, as stated in Garage Door Repair Services this guide is based on my personal experience, and it’s important to consult the specific instructions provided by your garage door opener’s manufacturer. If you encounter any difficulties or are unsure about the adjustment process, it’s always best to seek professional assistance from a technician who has experience with garage door openers. They can ensure the adjustments are done correctly and safely.

First Responder Garage Doors

180 State St. #225, Southlake, TX. 76092

817-991-5551

How to Program Jeep Garage Door Opener – CCM Overhead Doors

When it comes to programming a garage door opener in my Jeep, I’ve gone through the process a few times, and it’s relatively straightforward. Although the specific steps may vary depending on the Jeep model and the type of garage door opener you have, I’ll provide you with a general guide based on my knowledge. Please consult your Jeep’s owner’s manual for accurate instructions tailored to your specific model.

Here’s how I typically program a garage door opener in my Jeep based from Garage Door Repair:

First, I ensure that my garage door opener is compatible with the HomeLink system used in Jeeps. The HomeLink system is a universal garage door opener integrated into many Jeep models. It’s important to note that not all garage door openers are compatible, especially older models that use different frequency signals.

Once I’ve verified compatibility, I clear any previous programming if applicable. If I’m reprogramming the garage door opener or using a pre-owned Jeep, it’s essential to clear any existing codes. This step prepares the HomeLink system for learning and programming new codes. I refer to my Jeep’s owner’s manual for specific instructions on how to clear previous programming, as it may vary between models.

Next, I locate the HomeLink buttons in my Jeep. In most Jeep models, the HomeLink buttons are located on the overhead console, near the rearview mirror. The console typically consists of three buttons labeled “HomeLink” or featuring icons representing a house or a garage door.

With my Jeep’s ignition turned to the “On” position (or the engine running, depending on the model), I put the HomeLink system in programming mode. It’s important to keep the ignition on throughout the programming process to ensure a successful connection.

I choose one of the HomeLink buttons that I want to program for my garage door opener. I press and hold that button until the indicator light on the HomeLink console begins to flash. This light is usually located on the console itself.

To program the HomeLink button, I hold my handheld garage door opener transmitter close to the HomeLink console in my Jeep, without touching it. It’s crucial to ensure that the battery in the handheld transmitter is fresh and functional.

Simultaneously, I press the programmed button on the handheld transmitter and the HomeLink button I selected in the previous step. I continue holding both buttons until the HomeLink indicator light on the console changes from a slow flash to a rapid flash. This process usually takes a few seconds.

To confirm that the programming was successful, I exit my Jeep and stand within range of my garage door. I press the HomeLink button I programmed for the garage door opener, and if everything was done correctly, the garage door should activate, either opening or closing. If the door doesn’t respond, I may need to repeat the programming process or consult the troubleshooting section in my owner’s manual for further assistance.

If I have additional HomeLink buttons in my Jeep, I follow the same process to program them for other garage door openers or devices. Each HomeLink button can be programmed for a different device, such as a second garage door or a gate opener.

It’s essential to note that these steps are general guidelines based on my experience, and the specific procedures may vary depending on your Jeep model and the type of garage door opener you have. I highly recommend consulting your Jeep’s owner’s manual for accurate instructions and any model-specific details.

By following these general steps from Garage Door Repair, I’ve been able to successfully program my Jeep’s HomeLink system to operate my garage door opener. Now, I can conveniently open and close my garage door with ease from the comfort of my vehicle.

CCM Overhead Doors

1000 NW 80th St, Oklahoma City, OK 73114, United States

405-563-8982

How to Manually Open a Garage Door – Affordable Garage Door Repairs of Indianapolis, LLC

Here’s how I would manually open a garage door based from Garage Door Repair Services:

First, I locate the emergency release cord. I look for the red handle or rope hanging from the garage door opener mechanism. This cord is essential for manually operating the door.

Next, I ensure that the garage door is fully closed before attempting to open it manually. This step is important to ensure that the door is properly aligned and to prevent any accidents or damage during the manual operation.

With everything set, I reach up and firmly grasp the emergency release cord. I pull it downward in a swift motion. As I do so, I can feel the garage door being disengaged from the opener mechanism, allowing it to move freely.

Now it’s time to lift the garage door manually. I position myself near the bottom edge of the door and use both hands to grip it firmly. With a steady and even pressure, I begin to lift the door upward. I am cautious of the door’s weight, especially if it’s large or made of heavy materials, to avoid strain or injury.

I continue lifting the door until it reaches the desired height. It’s important to maintain a firm grip and ensure a smooth upward motion. If I need to keep the door open for an extended period, I consider using a locking mechanism or a brace to secure it in place and prevent accidental closing.

Once the garage door is at the desired height, I verify that it is securely held in position. I gently release my grip and observe if the door remains in place. If it starts descending, I know that it is not properly secured, and I would seek assistance from a professional garage door technician.

When it’s time to close the garage door manually, I check for any obstructions in its path. With caution, I grasp the bottom edge of the door and begin lowering it slowly and carefully. I pay close attention to my surroundings, making sure to keep my hands clear of pinch points or moving parts.

After manually closing the door, I need to reconnect it to the opener mechanism. I locate the emergency release cord once again and pull it in the opposite direction, returning it to its original position. This action re-engages the door with the opener, allowing for automatic operation in the future.

To ensure that the reconnection was successful, I test the automatic operation of the garage door using the opener or remote. I open and close the door a few times to verify that it functions properly and securely latches when closed.

By following these steps from Garage Door Repair Services and being mindful of safety precautions, I can manually open and close my garage door when necessary. However, I understand that manual operation should only be a temporary solution, and any issues with the automatic operation of the door should be addressed by a professional garage door technician.

Affordable Garage Door Repairs of Indianapolis, LLC

Indianapolis, IN

317-372-5337

Powered by WordPress & Theme by Anders Norén