Local Services in Texas

Tag: Windows Replacement

How Do You Ensure Proper Insulation During Window Replacement? – North Texas Home Exteriors

 Windows Replacement North TX in your home is a significant investment that not only enhances aesthetics but also improves energy efficiency and comfort.

Proper insulation during window replacement is crucial to ensure optimal performance and prevent heat loss or gain. In this comprehensive guide, we will explore various techniques and strategies to ensure proper insulation during window replacement, helping you create a more energy-efficient and comfortable living environment.

Understanding the Importance of Insulation

Insulation plays a critical role in maintaining thermal comfort and energy efficiency in your home. Windows are one of the primary areas where heat can escape or enter, making proper insulation essential during replacement. Effective insulation helps create a barrier against outdoor temperatures, reducing the need for heating and cooling and lowering energy bills.

Steps to Ensure Proper Insulation During Window Replacement

1. Choose Energy-Efficient Windows

When replacing windows, opt for energy-efficient models that offer superior insulation properties. Look for windows with high-quality frames and multiple panes of glass, such as double or triple-glazed windows. These windows feature insulating gas fills and low-emissivity (Low-E) coatings that minimize heat transfer and improve thermal performance.

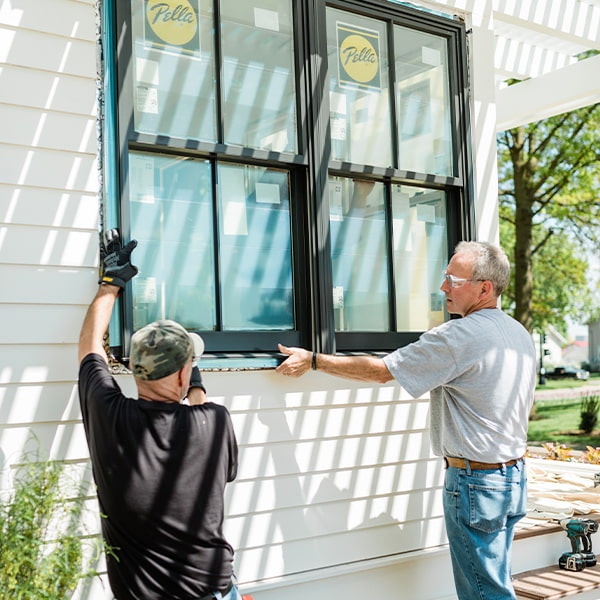
2. Proper Measurement and Installation

Accurate measurement and installation are essential for ensuring proper insulation during window replacement. Measure the window openings carefully to ensure a precise fit, and follow manufacturer guidelines for installation. Proper sealing and insulation around the window frame are crucial to prevent air leaks and ensure optimal energy efficiency.

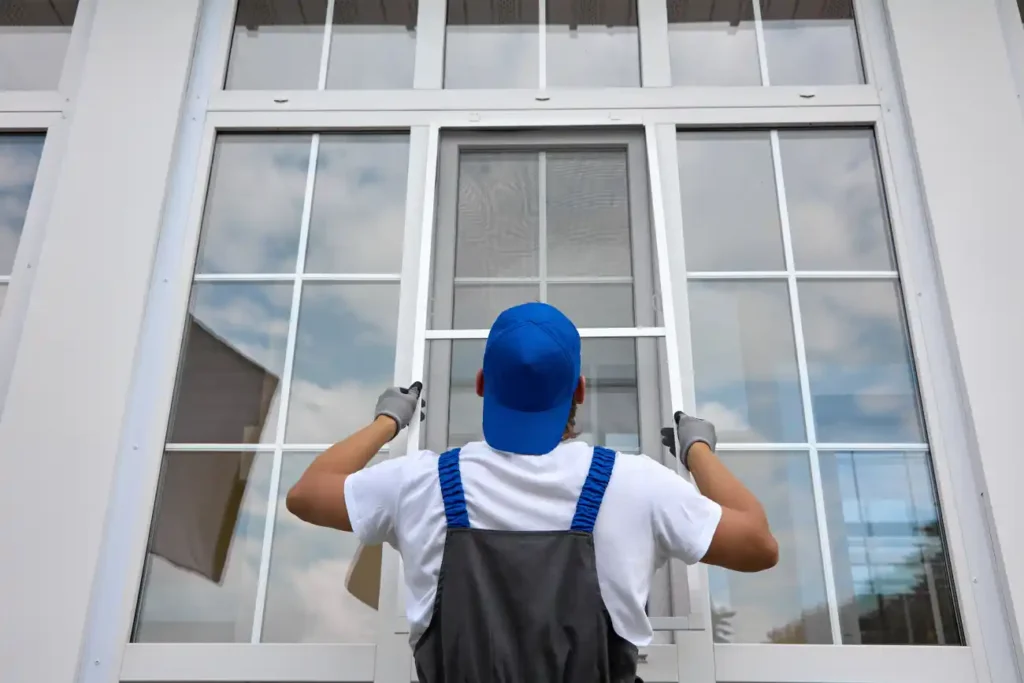
3. Insulate Around the Window Frame

During installation, use insulation materials such as expanding foam or fiberglass insulation to fill gaps and seal around the window frame. Insulation helps prevent air infiltration and improves the overall thermal performance of the window. Be sure to use appropriate insulation materials recommended for window installations and follow safety precautions during application.

4. Install Insulated Window Frames

Consider installing window frames with built-in insulation to enhance energy efficiency further. Insulated frames, such as vinyl or fiberglass, offer better thermal performance compared to traditional materials like aluminum. These frames help reduce heat transfer and minimize condensation, contributing to a more comfortable indoor environment.

5. Seal and Weatherstrip

Proper sealing and weatherstripping are essential for preventing drafts and air leaks around windows. Use high-quality sealants and weatherstrips to seal gaps between the window frame and the wall. Pay attention to areas where the window meets the wall, as well as around the perimeter of the window frame. Proper sealing helps improve insulation and energy efficiency while enhancing indoor comfort.

6. Consider Exterior Insulation

In addition to insulating around the window frame, consider adding exterior insulation to further enhance energy efficiency. Exterior insulation options include insulated siding, rigid foam panels, or spray foam insulation applied to the exterior walls around the windows. Exterior insulation helps minimize thermal bridging and heat loss through the walls, contributing to overall energy savings.

7. Upgrade Window Treatments

To complement the insulation provided by new windows, consider upgrading window treatments such as curtains, blinds, or shades. Choose energy-efficient window coverings that provide additional insulation and help reduce heat gain or loss through the windows. Insulated curtains or cellular shades with honeycomb designs are excellent choices for improving thermal performance and enhancing comfort.

Conclusion:

Proper insulation during window replacement is essential for maximizing energy efficiency, enhancing comfort, and reducing heating and cooling costs. By following the steps outlined in this comprehensive guide, you can ensure that your new windows are properly insulated and installed to provide optimal performance. From choosing energy-efficient windows and frames to sealing gaps and upgrading window treatments, each step plays a crucial role in creating a more comfortable and energy-efficient living environment. Invest in proper insulation during window replacement to enjoy long-term benefits and savings on your energy bills.

North Texas Home Exteriors

1-817-201-6800

How Do I Choose The Best Window Replacement Contractor? – North Texas Home Exteriors

Windows Replacement North TX is a significant investment in your home’s comfort, energy efficiency, and aesthetic appeal.

However, selecting the best window replacement contractor can be a daunting task, considering the multitude of options available. To ensure a successful and satisfactory window replacement project, it’s essential to choose a reputable and reliable contractor. In this comprehensive guide, we’ll outline the key factors to consider when selecting the best window replacement contractor for your needs.

  1. Research Potential Contractors: Start by researching potential window replacement contractors in your area. You can use online resources such as search engines, review websites, and social media platforms to compile a list of contractors. Additionally, ask for recommendations from friends, family, and neighbors who have recently undertaken window replacement projects. Create a shortlist of contractors based on their reputation, experience, and customer reviews.
  2. Check Credentials and Experience: Once you have a list of potential contractors, verify their credentials and experience. Look for contractors who are licensed, bonded, and insured to perform window replacement services in your area. Check if they are certified by reputable organizations such as the National Association of Home Builders (NAHB) or the Window & Door Manufacturers Association (WDMA). Furthermore, inquire about their experience in the industry and their track record of successfully completing window replacement projects similar to yours.
  3. Review Portfolios and References: Ask each contractor on your shortlist to provide a portfolio of their past window replacement projects. Reviewing their portfolio will give you insight into the quality of their workmanship and the types of windows they specialize in. Additionally, request references from past clients and contact them to inquire about their experience working with the contractor. Ask specific questions about the contractor’s professionalism, communication, timeliness, and overall satisfaction with the project.
  4. Obtain Multiple Quotes: Before making a decision, obtain quotes from multiple window replacement contractors to compare pricing and services. Be wary of contractors who provide significantly lower quotes than their competitors, as they may cut corners or use inferior materials. Ensure that each quote is detailed and includes the cost of materials, labor, permits, and any additional services such as disposal of old windows or repairs to surrounding structures.
  5. Evaluate Product Quality and Selection: Consider the quality and selection of windows offered by each contractor. Choose a contractor who offers a wide range of high-quality window products from reputable manufacturers. Ask about the energy efficiency ratings, durability, and warranty coverage of the windows they recommend. Additionally, inquire about customization options such as window styles, frame materials, and glass options to ensure that the windows meet your specific needs and preferences.
  6. Assess Installation Process and Warranty: Inquire about the installation process and warranty coverage offered by each contractor. Choose a contractor who employs trained and experienced installers to ensure proper installation and minimize the risk of issues such as air leaks or water infiltration. Additionally, verify the warranty coverage provided for both the windows and the installation labor. A reputable contractor should offer a comprehensive warranty that covers defects in materials and workmanship for an extended period.
  7. Check for Regulatory Compliance: Ensure that the window replacement contractor you choose complies with all local building codes and regulations. Verify that they obtain the necessary permits for the project and adhere to safety standards and best practices during installation. Working with a contractor who follows regulatory requirements will help avoid potential legal issues and ensure that your window replacement project meets quality and safety standards.
  8. Consider Customer Service and Communication: Lastly, consider the level of customer service and communication provided by each contractor. Choose a contractor who is responsive, communicative, and transparent throughout the entire process, from initial consultation to project completion. Pay attention to how they address your questions and concerns and how promptly they respond to emails or phone calls. Effective communication is key to a successful window replacement project and ensures that your needs are met every step of the way.

Conclusion:

Choosing the best window replacement contractor requires careful research, consideration of credentials and experience, evaluation of product quality and selection, and assessment of installation process and warranty coverage. By following the guidelines outlined in this comprehensive guide, you can select a reputable and reliable contractor who will deliver high-quality windows and expert installation services tailored to your needs and budget. With the right contractor by your side, you can enjoy the benefits of new windows that enhance the comfort, energy efficiency, and value of your home for years to come.

North Texas Home Exteriors

1-817-201-6800

What Are The Key Steps Involved In Replacing Windows – Grapevine Siding & Window Replacement

Grapevine Siding & Window Replacement in your home is a significant home improvement project that can enhance energy efficiency, aesthetics, and overall comfort. Proper window replacement involves a series of key steps to ensure a successful and durable installation.

In this comprehensive guide, we’ll outline the essential steps involved in replacing windows in your home.

1. Evaluate Your Needs and Goals

Before you begin the window replacement process, it’s crucial to identify your specific needs and goals. Consider factors such as energy efficiency, aesthetics, functionality, and budget. Determine whether you want to replace all windows in your home or focus on specific areas.

2. Measure and Assess Existing Windows

Measure each existing window carefully to determine the size and shape of the openings. Assess the condition of the current windows, including any damage, leaks, or drafts. This information will help you choose the right replacement windows.

3. Choose Window Types and Materials

Select the type of windows that best suit your needs and style preferences. Common window types include:

  • Single or Double-Hung Windows: These windows have two sashes (moveable panels), with single-hung windows allowing only the bottom sash to move and double-hung windows allowing both sashes to open.
  • Casement Windows: These windows are hinged on one side and open outward with a crank mechanism.
  • Slider Windows: Slider windows have two or more horizontal sashes that slide horizontally past each other.
  • Awning Windows: Awning windows are hinged at the top and open outward from the bottom, creating an awning-like effect.
  • Bay and Bow Windows: These are large, projecting windows that create a three-dimensional architectural feature, adding space and character to a room.
  • Picture Windows: Picture windows are fixed, meaning they don’t open. They are designed to provide unobstructed views and natural light.

Choose window materials such as vinyl, wood, fiberglass, or aluminum based on your preferences and budget. Consider factors like maintenance requirements, insulation properties, and durability.

4. Obtain Necessary Permits

In some areas, window replacement may require building permits or adherence to local building codes. Check with your local municipality or building department to determine whether permits are necessary and to obtain any required permits before starting the project.

5. Prepare the Work Area

Clear the area around the windows both inside and outside your home. Remove furniture, window treatments, and any obstacles that may obstruct access to the windows. Create a clean and safe workspace for the installation crew.

6. Remove Old Windows

The process of removing old windows involves the following steps:

  • Carefully remove the interior trim or casing around the old windows.
  • Pry off any exterior trim, siding, or cladding that covers the window frame.
  • Use a utility knife to cut through any caulking or sealant around the window.
  • Remove any screws, nails, or fasteners securing the old window frame to the rough opening.
  • Gently pry the old window unit from the rough opening. Be cautious not to damage the surrounding walls or frame.

7. Prepare the Rough Opening

Inspect the rough opening for damage, rot, or any issues that need repair. Make necessary repairs to ensure a solid and weather-tight foundation for the new windows. Clean the opening of debris and ensure it is level and square.

8. Install Flashing and Insulation

Proper insulation and flashing are essential for energy efficiency and preventing water intrusion. Install a weather-resistant barrier or house wrap over the sheathing, ensuring it covers the entire opening. Apply self-adhesive flashing tape over the weather-resistant barrier to create a water-resistant seal. Insulate the gaps around the window frame with low-expansion foam insulation to improve energy efficiency.

9. Set the New Window

Carefully place the new window unit into the prepared rough opening. Ensure it is level, plumb, and square within the opening. Use shims to adjust the window’s position as needed. Fasten the window to the framing by driving screws or nails through the window’s flange or nailing fin into the surrounding structure.

10. Insulate and Seal

Seal the gaps between the window frame and the rough opening with a high-quality caulk or sealant. Pay close attention to the corners and edges to create an airtight and watertight seal. Insulate any remaining gaps with expanding foam insulation to improve energy efficiency.

11. Install Trim and Casing

Replace or install interior and exterior trim and casing to cover gaps and create a finished appearance. Ensure that the trim is securely fastened and complements the style of your home’s interior and exterior.

12. Test Operation and Inspect

Operate the new windows to ensure they open and close smoothly and securely. Check for any gaps or issues with the seal. Inspect both the interior and exterior for any visible defects or signs of damage.

13. Finish and Paint

If necessary, finish and paint the window trim, casing, and any other exposed surfaces to match your home’s décor. Use paint that is suitable for the material of the windows and trim.

14. Clean Up

Thoroughly clean both the interior and exterior of your home, removing any debris, dust, or construction materials from the work area. Dispose of old windows and materials according to local regulations.

15. Test for Energy Efficiency

After installation, conduct an energy efficiency test to ensure that the new windows are performing as expected. Check for drafts, temperature fluctuations, and any condensation issues.

16. Apply Final Touches

Add any final touches, such as window treatments, curtains, blinds, or hardware, to complete the look and functionality of your new windows.

17. Keep Records

Keep records of warranties, permits, and any important documentation related to your window replacement project. This will be valuable for future reference and maintenance.

18. Schedule a Follow-Up Inspection

Consider scheduling a follow-up inspection with the installation crew or contractor to ensure that the windows are functioning correctly and that there are no issues that need attention.

19. Regular Maintenance

To prolong the life of your new windows, follow a regular maintenance routine, which may include cleaning, lubricating moving parts, and inspecting for any signs of wear or damage.

20. Enjoy the Benefits

With your new windows properly installed, enjoy the benefits of improved energy efficiency, enhanced aesthetics, and increased comfort in your home. You’ll likely notice reduced energy bills and a more pleasant living environment.

Conclusion

Grapevine Siding & Window Replacement is a complex but rewarding home improvement project. By following these key steps and working with experienced professionals when needed, you can ensure a successful window replacement that adds value, energy efficiency, and beauty to your home. Properly installed windows can make a significant difference in your home’s comfort and overall appeal, making the investment well worth it.

Grapevine Siding & Window Replacement

2140 Hall – Johnson Rd #102, Grapevine, TX 76051, United States

1-817-508-9754

What Are The Key Steps Involved In Replacing Windows – North Texas Home Exteriors

Replacing windows in North Texas Home Exteriors is a significant home improvement project that involves several key steps to ensure a successful and effective outcome.

From planning and preparation to installation and finishing touches, here’s a comprehensive guide outlining the key steps involved in replacing windows:

1. Assessment and Planning:
Before starting the window replacement process, assess your needs, preferences, and budget. Determine the type of windows you want to install, such as single or double-hung, casement, or sliding windows. Consider factors like energy efficiency, aesthetics, and functionality. Plan the project timeline, taking into account weather conditions and your availability.

2. Measurements and Ordering:
Accurate measurements are crucial for ordering the right-sized windows. Measure the width, height, and depth of the window openings from inside the home. Take measurements at multiple points to account for variations. Use the measurements to order the windows from a reputable supplier or manufacturer.

3. Window Removal:
Carefully remove the existing windows. Start by removing the window sashes (the movable parts of the window), followed by the frame and any trim. Use caution to avoid damaging the surrounding walls and trim.

4. Prep Work and Cleaning:
Prepare the window openings by cleaning the area, removing debris, and ensuring a smooth surface for the new windows. Repair any damaged wood or structural issues in the window frame and surrounding area.

5. Installation of New Windows:
Install the new windows according to the manufacturer’s guidelines. Follow these general steps:

A. Place the New Window:
Position the new window into the opening, ensuring it fits snugly and is level and plumb. Use shims to achieve a precise fit.

B. Secure the Window:
Secure the window in place by attaching it to the frame with screws. Ensure that it’s securely fastened and level.

C. Insulate and Seal:
Apply insulation and sealant around the perimeter of the window frame to prevent air leaks and drafts. Use appropriate materials for your climate and window type.

D. Test Functionality:
Test the functionality of the window by opening and closing it multiple times to ensure smooth operation. Check for any gaps, drafts, or misalignments.

6. Exterior Finishing:
Install exterior trim and flashing around the window to protect against moisture infiltration. Ensure that the trim is properly sealed to prevent water damage.

7. Interior Finishing:
Install interior trim or casing around the window frame to create a finished look. Caulk and paint the trim to match your interior decor.

8. Weatherproofing:
Ensure that the area around the window is properly weatherproofed. Apply weatherstripping and caulking as needed to prevent drafts and leaks.

9. Cleaning and Inspection:
Clean the new windows and the surrounding area to remove any construction residue. Inspect the windows for any defects, ensure proper sealing, and test their functionality once more.

10. Disposal and Recycling:
Dispose of the old windows and any construction debris according to local regulations. Consider recycling materials that can be reused.

11. Final Touches:
Once the windows are installed and properly sealed, add final touches such as blinds, curtains, or window treatments to enhance privacy and aesthetics.

12. Maintenance and Care:
Regularly clean and maintain your new windows to ensure their longevity and optimal performance. Keep an eye out for any signs of wear or damage and address them promptly.

13. Professional Help:
While some homeowners may be comfortable with DIY window replacement, if you’re uncertain about any step or lack the necessary skills, consider hiring professional window installers. Their expertise can ensure proper installation, energy efficiency, and long-term durability.

In conclusion, replacing windows in North Texas Home Exteriors involves a series of crucial steps that require careful planning, accurate measurements, precise installation, and thorough finishing. By following these key steps, you can achieve a successful window replacement project that enhances the aesthetics, energy efficiency, and functionality of your home while also increasing its value. Whether you choose to tackle the project yourself or hire professionals, taking the time to complete each step with care will result in windows that provide comfort, beauty, and functionality for years to come.

North Texas Home Exteriors

1-817-201-6800

Powered by WordPress & Theme by Anders Norén