Local Services in Texas

Tag: garage door repair service Page 1 of 2

Does Sears Install Garage Door Openers –  First Call Garage Doors


Yes, Sears offers professional installation services for Garage Door Repair Richmond TX Sears Home Services provides a wide range of home improvement and repair solutions, including garage door opener installation.

Here’s an overview of Sears’ garage door opener installation services:

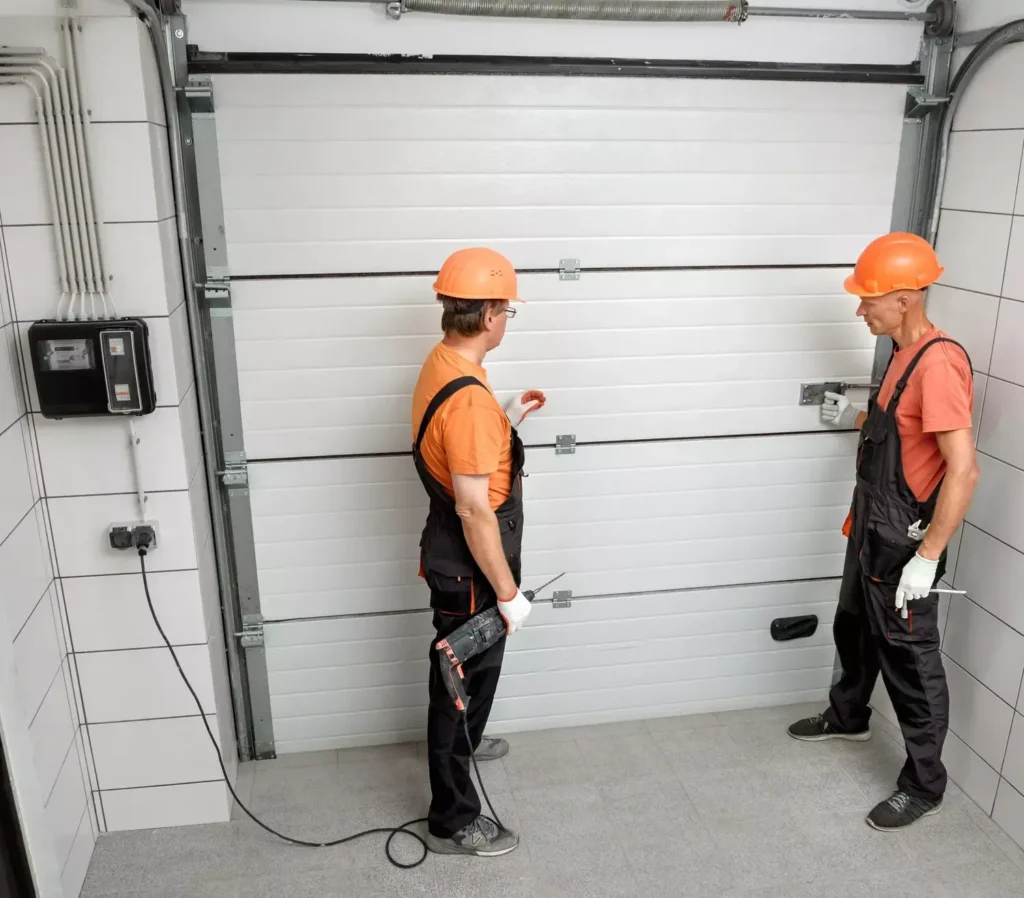
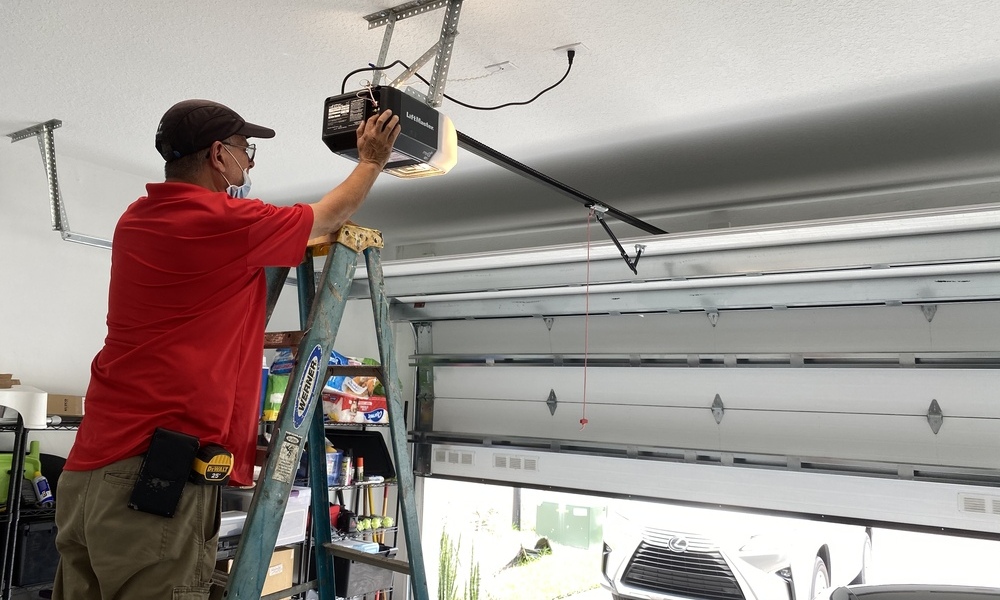
  1. Expert Technicians: Sears employs experienced technicians who are trained to install various types and brands of garage door openers. These technicians have the knowledge and expertise to ensure proper installation and reliable operation of your garage door opener.
  2. Comprehensive Installation: Sears’ installation service covers every aspect of installing a garage door opener, from mounting the opener unit to programming remote controls and safety sensors. The technicians will handle all aspects of the installation process, including electrical connections and testing.
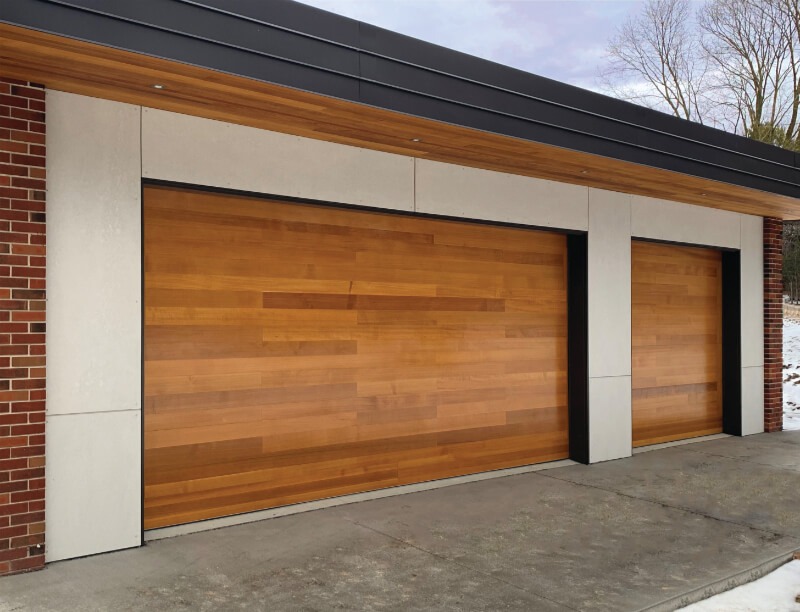
  3. Quality Products: Sears offers a selection of high-quality garage door openers from trusted brands like Craftsman, LiftMaster, and Chamberlain. These openers are known for their durability, performance, and advanced features, ensuring long-term reliability and convenience.
  4. Custom Solutions: Sears understands that every home and garage is unique, which is why their installation services are tailored to meet your specific needs and preferences. Whether you need a basic garage door opener or a model with advanced features like smartphone connectivity, Sears can provide a solution that fits your requirements.
  5. Professionalism and Convenience: When you choose Sears for your garage door opener installation, you can expect professionalism, reliability, and convenience. The technicians will arrive on time, complete the installation efficiently, and clean up after the job is done, ensuring a hassle-free experience for you.
  6. Warranty and Satisfaction Guarantee: Sears stands behind their workmanship and products, offering warranties on both parts and labor for added peace of mind. If you encounter any issues with your garage door opener after installation, Sears will address them promptly to ensure your satisfaction.
  7. Additional Services: In addition to garage door opener installation, Sears Home Services offers a range of related services, including garage door repair, maintenance, and replacement. Whether you need a minor repair or a complete garage door overhaul, Sears has you covered.

With their expertise, quality products, and commitment to customer satisfaction, Sears ensures that your new Garage Door Repair Richmond TX  is installed correctly and performs reliably for years to come.

First Call Garage Doors

20527 FM 1093 Rd Unit B205 Richmond, TX 77407

713-248-2684

https://maps.app.goo.gl/t63qb9AmNfom8KU87

How To Bypass Garage Door Safety Beam – BH Garage Doors and Gates


Attempting to bypass or disable safety features such as the safety beam in a Garage Door Repair Rockwall TX can pose significant risks to personal safety and property.

However, there may be situations where you need to temporarily bypass the safety beam for troubleshooting or maintenance purposes. Keep in mind that any modifications to garage door safety features should be done with caution and only by individuals with the necessary knowledge and experience. It is always recommended to consult the manufacturer’s instructions or seek professional assistance when dealing with garage door safety systems.

If you need to temporarily bypass the garage door safety beam, here are some general steps you can follow:

1. Identify the Safety Beam Components:

  • Locate the safety beam sensors, which are typically installed on either side of the garage door opening, near the floor. These sensors transmit an invisible beam of light across the opening, and if the beam is interrupted by an object or person, it signals the door opener to stop and reverse the closing operation.

2. Disconnect Power to the Garage Door Opener:

  • Before attempting any modifications or adjustments, unplug the power cord of the garage door opener from the electrical outlet to prevent accidental activation.

3. Disable or Disconnect the Safety Beam Sensors:

  • Depending on the type of garage door opener and safety beam system, there may be different methods for disabling or bypassing the safety beam. Some common approaches include:
    • Temporarily disconnecting the wiring connections at the back of the opener unit or at the sensors themselves.
    • Using a jumper wire or shorting connector to bypass the sensor circuitry. This should only be done as a temporary measure for troubleshooting purposes and should not be left in place for regular operation.

4. Test the Garage Door Operation:

  • Once the safety beam sensors have been bypassed or disabled, test the garage door opener to ensure that it operates correctly without the safety beam functionality.
  • Close the garage door using the opener remote or wall button and observe the door’s movement to verify that it closes fully without stopping or reversing unexpectedly.

5. Reconnect Safety Beam Sensors (if necessary):

  • After completing the troubleshooting or maintenance tasks, reconnect the safety beam sensors and restore power to the garage door opener.
  • Test the garage door operation again to confirm that the safety beam functionality has been restored and that the door operates safely.

6. Consult a Professional if Needed:

  • If you encounter any difficulties or are unsure about how to bypass or troubleshoot the garage door safety beam, it is recommended to seek assistance from a qualified technician or professional garage door service provider.
  • Attempting to bypass safety features without proper knowledge and expertise can lead to accidents, injuries, or damage to property.

Conclusion:

BH Garage Doors and Gates

4035 N Goliad St, Rockwall, TX 75087, United States

1-214-206-5231

https://maps.app.goo.gl/iYdGkyhiGAiUXN3G7

How To Reset Overhead Garage Door Keypad – Camco Commercial Door Company


Resetting an overhead Garage Door Repair Knoxville TN  is a straightforward process that typically involves clearing the existing code and programming a new one. Whether you’re resetting the keypad due to security concerns, moving into a new home, or simply updating the access code, following these steps will guide you through the process.

Here’s a detailed guide on how to reset an overhead garage door keypad:

  1. Locate the Keypad: Begin by locating the overhead garage door keypad mounted outside your garage. The keypad is usually positioned near the entry door or on the wall adjacent to the garage door. Ensure that the keypad is accessible and within reach for programming.
  2. Identify the Reset Button: Look for a reset button or programming button on the keypad. The reset button is typically small and recessed to prevent accidental activation. It may be labeled as “Reset,” “Learn,” “Program,” or “Set,” depending on the manufacturer and model of the keypad. Use your fingers or a small tool, such as a paperclip or pen, to press and hold the reset button.
  3. Clear Existing Code: While holding down the reset button, simultaneously enter the current access code on the keypad. The access code is the combination of numbers used to open the garage door. Enter the code carefully and accurately to ensure that the keypad recognizes the command. Continue holding down the reset button until you see or hear a confirmation signal from the keypad, such as a beep or flashing light.
  4. Release the Reset Button: Once the existing code has been cleared, release the reset button on the keypad. The keypad will enter programming mode, indicated by a steady light or other visual cue. Take note of the programming mode to proceed with programming a new access code.
  5. Select a New Access Code: Choose a new access code that is easy to remember but difficult for others to guess. Avoid using common or sequential numbers, such as “1234” or “0000,” which are easily predictable. Aim for a combination of numbers that is unique and secure, such as your address, phone number, or a personalized sequence.
  6. Enter New Access Code: Once you’ve selected a new access code, enter it on the keypad using the numeric keypad buttons. Press each button firmly and accurately to input the code. Take your time to ensure that the code is entered correctly, as mistakes may require you to repeat the programming process.
  7. Test the New Access Code: After entering the new access code, test it to ensure that it activates the garage door opener as intended. Stand outside the garage door and enter the new code on the keypad. Listen for the sound of the garage door opener engaging and observe the door’s movement to confirm that the code is programmed correctly.
  8. Adjust Settings (Optional): Depending on the keypad model and manufacturer, you may have additional options or settings to customize, such as the delay time for closing the door or the number of digits in the access code. Refer to the manufacturer’s instructions or user manual for guidance on adjusting settings to suit your preferences.
  9. Secure the Keypad: Once you’ve programmed the new access code and adjusted any settings, securely mount the keypad in its designated location outside the garage. Use screws or mounting hardware provided with the keypad to attach it to the wall or door frame. Ensure that the keypad is positioned at a comfortable height and angle for easy access and visibility.
  10. Keep Access Code Secure: Maintain the security of your garage door access code by keeping it confidential and avoiding sharing it with unauthorized individuals. Memorize the code or store it in a secure location away from the keypad to prevent unauthorized access. Periodically update the access code or change it if you suspect it has been compromised.
  11. Test Regularly: Periodically test the overhead garage door keypad to ensure that it continues to function properly and that the access code works as intended. Test the keypad from outside the garage to verify that it reliably opens and closes the door without any issues. Address any concerns or malfunctions promptly to maintain the security and functionality of your garage door system.


Garage Door Repair Knoxville TN  If you encounter any difficulties or require assistance, refer to the manufacturer’s instructions or seek help from a qualified technician or locksmith familiar with garage door keypad systems.

Camco Commercial Door Company

1-865-776-9455

https://maps.app.goo.gl/EHYTdzvLDSBDwnoi8

How To Close A Garage Door With A Broken Spring – EDM Garage Doors, LLC


Garage Door Repair Volo IL It’s essential to proceed with caution and follow proper procedures to avoid injury or damage to the door and surrounding property.

Here’s a comprehensive guide on how to close a garage door with a broken spring in 1000 words:

Assess the Situation:

Before attempting to close the garage door, it’s essential to assess the condition of the broken spring and the overall state of the door. Look for signs of damage or misalignment, such as loose cables, bent tracks, or broken rollers, that could affect the door’s operation. If the door appears to be severely damaged or if you’re unsure how to proceed safely, it’s best to seek professional assistance from a qualified garage door technician.

Gather Necessary Tools and Equipment:

To safely close the garage door with a broken spring, you’ll need the following tools and equipment:

  1. Protective gloves
  2. Safety goggles
  3. A sturdy ladder or step stool
  4. Vice grips or locking pliers
  5. C-clamps or locking pliers
  6. A winding bar or sturdy metal rod

Release the Emergency Release Cord:

Most garage door openers are equipped with an emergency release cord or handle that disengages the opener mechanism and allows you to operate the door manually. Locate the emergency release mechanism, typically located near the opener motor or on the garage door track, and pull it down to disengage the opener.

Secure the Door in the Open Position:

Before attempting to close the garage door manually, it’s essential to secure it in the open position to prevent it from falling unexpectedly. Use locking pliers or C-clamps to secure the door tracks or rollers, ensuring that the door remains stable and stationary while you work.

Disconnect the Opener from the Door:

Once the door is securely open, disconnect the garage door opener from the door to prevent it from engaging accidentally during the closing process. This typically involves pulling the release cord or handle until you hear a clicking sound, indicating that the opener has been disconnected.

Support the Weight of the Door:

With the opener disconnected, you’ll need to support the weight of the garage door manually as you lower it to the closed position. Enlist the help of a friend or family member to assist you in supporting the door, especially if it’s large or heavy.

Lower the Door Carefully:

Using caution and working slowly, begin to lower the garage door manually by carefully guiding it downward. Use your hands to guide the door along the tracks, ensuring that it moves smoothly and evenly without binding or catching on any obstacles.

Use Vice Grips to Secure the Door:

As you lower the door, use vice grips or locking pliers to secure the door tracks or rollers at regular intervals along the track. This will help prevent the door from sliding back up unexpectedly and provide added stability as you work.

Avoid Putting Pressure on the Broken Spring:

When manually closing the garage door, it’s essential to avoid putting pressure on the broken spring or attempting to operate the door using the spring system. Doing so could cause further damage to the spring or compromise the door’s stability and safety.

Test the Door’s Operation:

Once the garage door is fully closed, test its operation by manually lifting and lowering it a few times to ensure that it moves smoothly and evenly along the tracks. Check for any signs of binding, sticking, or misalignment that could indicate underlying issues with the door or track system.

Secure the Door in the Closed Position:

After confirming that the garage door is functioning correctly, secure it in the closed position using locking pliers or C-clamps to prevent it from opening unexpectedly. Make sure that the door is securely closed and latched before releasing the weight of the door.

Schedule Repairs or Replacement:

Closing the garage door manually with a broken spring is only a temporary solution, and it’s essential to schedule repairs or replacement as soon as possible to restore the door’s proper function and safety. Contact a reputable garage door repair company to assess the damage and recommend the appropriate course of action.

Exercise Caution and Follow Safety Guidelines:

Throughout the process of closing the garage door with a broken spring, it’s crucial to exercise caution and follow proper safety guidelines to avoid injury or damage. Wear protective gloves and safety goggles to protect your hands and eyes from potential hazards, and enlist the help of a friend or family member to assist you in supporting the door safely.

Seek Professional Assistance if Needed:

If you encounter any difficulties or concerns while closing the garage door with a broken spring, don’t hesitate to seek professional assistance from a qualified garage door technician. They have the knowledge, experience, and equipment to address the issue safely and effectively, ensuring that your garage door is repaired or replaced promptly and correctly.


Garage Door Repair Volo IL Remember to schedule repairs or replacement promptly to restore the door’s proper function and ensure continued safety and security.

EDM Garage Doors, LLC

596 Richard Brown Blvd, Volo, IL 60073, United States

1-847-416-3036

How To Oil The Garage Door – Martin Garage Door

 Garage Door Repair Castle Rock CO  Over time, the moving parts of your garage door system, such as hinges, rollers, springs, and tracks, can become dry and worn, leading to increased friction, noise, and potential damage. By regularly lubricating these components with the right type of lubricant, you can prolong the lifespan of your garage door and prevent costly repairs.

Here’s how to oil your garage door effectively:

  1. Gather Your Supplies: Before you begin, gather the necessary supplies for oiling your garage door. You will need a can of silicone-based garage door lubricant or white lithium grease, a clean cloth or rag, and a step ladder or sturdy platform to access the various parts of the garage door system.
  2. Inspect the Door: Start by visually inspecting your garage door and its components for signs of wear, damage, or corrosion. Check the hinges, rollers, tracks, springs, and other moving parts for any loose or missing hardware, rust, or debris that may interfere with the lubrication process.
  3. Clean the Components: Use a clean cloth or rag to wipe away any dirt, dust, or debris from the hinges, rollers, tracks, and other parts of the garage door system. Cleaning the components beforehand will ensure that the lubricant can penetrate and adhere to the surfaces properly, providing optimal lubrication.
  4. Apply the Lubricant: Shake the can of silicone-based garage door lubricant or white lithium grease thoroughly to ensure proper mixing of the ingredients. Then, apply a small amount of lubricant to each hinge, roller, and pivot point along the track using the nozzle or straw attachment provided with the can. Be sure to apply the lubricant sparingly to avoid excess buildup, which can attract dirt and debris.
  5. Work the Lubricant In: After applying the lubricant, manually operate the garage door several times to distribute the lubricant evenly and work it into the moving parts. Open and close the door fully to allow the lubricant to penetrate the hinges, rollers, and tracks, ensuring smooth and quiet operation.
  6. Focus on Key Areas: Pay special attention to key areas of the garage door system that experience the most friction and wear, such as the hinges, rollers, bearings, and springs. Apply additional lubricant to these areas as needed to ensure proper lubrication and reduce wear and tear.
  7. Check for Smooth Operation: Once you’ve lubricated all the moving parts of the garage door, test the door’s operation to ensure that it moves smoothly and quietly. Listen for any unusual noises or resistance as the door opens and closes, and visually inspect the components for proper alignment and movement.
  8. Repeat as Needed: Depending on the frequency of use and environmental conditions, you may need to oil your garage door every six months to a year to maintain optimal performance. Monitor the door’s operation regularly and reapply lubricant as needed to keep it running smoothly.
  9. Dispose of Excess Lubricant: Properly dispose of any excess lubricant or used rags according to local regulations. Avoid allowing lubricant to drip onto the garage floor or surrounding surfaces, as it can create slippery conditions and attract dirt and debris.
  10. Schedule Regular Maintenance: In addition to oiling your garage door, schedule regular maintenance checks and inspections by a professional garage door technician to identify any potential issues or worn parts that may require repair or replacement. Regular maintenance can help extend the lifespan of your garage door and ensure safe and reliable operation for years to come.

 Garage Door Repair Castle Rock CO  By following these steps and using the right type of lubricant you can prolong the lifespan of your garage door and prevent costly repairs down the line.

Martin Garage Door

10411 S Parker Rd, Parker, CO 80134, United States

1-303-663-1310

How To Open A Garage Door That Is Stuck – MF Solutions

Garage Door Repair Grove IL However, with some troubleshooting and careful handling, you can often resolve the issue and open the door safely.

Here’s a comprehensive guide on how to open a stuck garage door:

1. Identify the Cause of the Problem:

  • Before attempting to open the garage door, try to determine the cause of the issue. Common reasons for a stuck garage door include:
    • Obstructed tracks or rollers
    • Broken springs or cables
    • Misaligned sensors or safety features
    • Power outage or malfunctioning opener

2. Disconnect the Opener:

  • If the garage door opener is causing the problem, disconnect it from the power source or release the emergency release cord. This allows you to manually operate the door without interference from the opener.

3. Check for Obstructions:

  • Inspect the tracks, rollers, and hinges for any obstructions or debris that may be blocking the door’s movement. Clear away any dirt, leaves, or objects that could be preventing the door from opening smoothly.

4. Lubricate Moving Parts:

  • Apply a lubricant to the tracks, rollers, hinges, and springs to reduce friction and help the door move more freely. Use a silicone-based lubricant or garage door lubricant spray for best results.

5. Try Manual Operation:

  • If the garage door opener is disconnected, attempt to open the door manually. Pull the emergency release cord to disengage the opener mechanism, then lift the door by hand. Be cautious and enlist the help of another person if needed, as garage doors can be heavy.

6. Check the Springs and Cables:

  • Inspect the springs and cables for signs of damage or wear. Broken or damaged springs can prevent the door from opening properly. If you suspect a problem with the springs or cables, it’s best to seek professional assistance for repairs.

7. Adjust the Tracks:

  • If the tracks are misaligned, use a level to check their alignment and adjust them as needed. Loosen the bolts or screws securing the tracks to the wall or ceiling, then gently tap the tracks with a rubber mallet to realign them. Tighten the bolts or screws once the tracks are aligned correctly.

8. Test Safety Features:

  • Modern garage doors are equipped with safety features such as photo-eye sensors and auto-reverse mechanisms. Check to ensure that these safety features are functioning properly and not causing the door to remain stuck. Clean the sensors and realign them if necessary.

9. Apply Gentle Pressure:

  • If the door is stuck partially open, apply gentle pressure to the bottom of the door to encourage it to move. Avoid using excessive force, as this could damage the door or opener mechanism.

10. Call a Professional:

  • If you’re unable to resolve the issue on your own or if you suspect a serious problem with the door or opener, it’s best to contact a professional garage door technician for assistance. Attempting DIY repairs on complex garage door systems can be dangerous and may cause further damage.

Conclusion:

Garage Door Repair Grove IL If you’re unsure or unable to fix the problem yourself, don’t hesitate to seek professional assistance to avoid potential injury or further damage to your garage door system.

MF Solutions

1-224-434-1780

Why is My Garage Door Light Blinking and Won’t Close-Team Taylor Doors

There can be several reasons why your Garage Door Repair light is blinking and won’t close. In this response, I will explore some possible causes and troubleshooting steps you can take to resolve the issue.

Please note that this is a general guide and specific instructions may vary depending on the make and model of your garage door opener. It’s always recommended to consult the manufacturer’s manual or contact a professional if you are unsure or uncomfortable performing these tasks.

  1. Obstruction Detection: Modern garage door openers are equipped with sensors that detect objects in the door’s path. If the sensors detect an obstruction, the door will not close and the light might blink. Inspect the area around the door and make sure there are no objects blocking the sensors. Additionally, check if the sensors are properly aligned. They should have a clear line of sight with no obstructions.
  2. Power Interruption: A power interruption can cause the garage door opener to malfunction. Check if the opener is receiving power by ensuring it is plugged in securely. If it is, check the circuit breaker or fuse that controls the garage door opener to see if it has tripped or blown. If necessary, reset the breaker or replace the fuse.
  3. Sensor Malfunction: If the sensors are clean, aligned, and unobstructed but the problem persists, they may be malfunctioning. Inspect the sensors for any visible damage or loose wiring. If you notice any issues, contact a professional to repair or replace the sensors.
  4. Remote Control Issues: Sometimes, problems with the remote control can prevent the garage door from closing properly. Check if the batteries in the remote are working and properly inserted. If the remote has a programming feature, try reprogramming it according to the manufacturer’s instructions. You can also try using a different remote control if available to determine if the issue lies with the remote itself.
  5. Opener Limits: Garage door openers have adjustable travel and force limits to ensure safe and proper operation. If these limits are not set correctly, it can cause the door to stop and the light to blink. Consult your garage door opener’s manual for instructions on adjusting the travel and force limits. Make small adjustments and test the door’s operation after each change until the issue is resolved.
  6. Manual Lock: Some garage doors have a manual lock feature that prevents the door from opening or closing automatically. If your door has a manual lock, ensure that it is disengaged or unlocked. Attempting to close the door while the lock is engaged can cause the light to blink and the door to stop.
  7. Motor or Gear Issues: If none of the above steps resolve the issue, there may be a problem with the garage door opener’s motor or gears. Over time, the motor or gears can wear out or become damaged, causing the door to stop and the light to blink. In such cases, it is advisable to contact a professional garage door technician to diagnose and repair the problem.

Remember, Garage Door Repair can be heavy and potentially dangerous if not handled properly. If you are unsure about any of the troubleshooting steps or feel uncomfortable performing them, it is best to seek professional assistance to avoid accidents and further damage to the door or opener.

Team Taylor Doors

210 SW Market St Suite 144, Lee’s Summit, MO 64063

1-816-408-6999

How to Fix Garage Door Opener-MF Solutions, Inc

A malfunctioning Garage Door Repair opener can be frustrating and inconvenient. However, with some basic troubleshooting and a few simple steps, you can often fix the issue yourself.

In this guide, we will walk you through the process of fixing common problems with garage door openers. It is important to note that safety should always be a priority when working on garage doors, so make sure to follow the manufacturer’s instructions and take necessary precautions.

  1. Identify the Problem: The first step in fixing a garage door opener is to identify the problem. Common issues include the door not responding to the remote or wall switch, the motor running but the door not moving, or the door reversing after hitting the floor. By understanding the symptoms, you can narrow down the potential causes and find an appropriate solution.
  2. Check Power and Connections: Ensure that the garage door opener is properly connected to a power source. Check if the outlet is functional and the cord is securely plugged in. If the opener has a battery backup, make sure the battery is fully charged. Additionally, inspect the wiring connections for any loose or damaged wires and tighten or replace them if necessary.
  3. Inspect the Remote Control: If the door doesn’t respond to the remote control, start by replacing the batteries. Clean the battery contacts and ensure they are making good contact with the batteries. If the issue persists, try reprogramming the remote according to the manufacturer’s instructions. If none of these steps work, it might be a problem with the remote itself, and you may need to replace it.
  4. Adjust the Safety Sensors: Garage door openers are equipped with safety sensors that prevent the door from closing if an object is in the way. If the door doesn’t close completely or reverses immediately after hitting the floor, check the alignment and cleanliness of the sensors. Make sure nothing is obstructing the sensor’s path and that they are facing each other. Clean the lenses with a soft cloth and adjust their positions until the indicator lights are aligned.
  5. Lubricate Moving Parts: Garage doors have several moving parts that require regular lubrication to operate smoothly. Apply a silicone-based lubricant to the rollers, hinges, and tracks to reduce friction. Avoid using oil-based lubricants as they can attract dirt and grime, causing more problems in the long run.
  6. Check the Trolley and Drive Belt/Chain: If the motor runs but the door doesn’t move, the problem could lie with the trolley or the drive belt/chain. Inspect the trolley for any obstructions or debris that may prevent it from engaging with the drive mechanism. If the trolley appears fine, check the drive belt/chain for signs of damage, such as fraying or excessive slack. Tighten or replace the belt/chain as necessary.
  7. Reset the Opener: Sometimes, resetting the garage door opener can resolve minor issues. Consult the manufacturer’s manual to find the reset procedure specific to your model. Typically, it involves disconnecting the power for a few minutes and then reconnecting it to reset the opener’s internal settings.
  8. Seek Professional Help: If you have followed all the steps mentioned above and the problem persists, it may be time to contact a professional garage door technician. They have the expertise and specialized tools to diagnose and fix complex issues safely.

Conclusion: Fixing a Garage Door Repair opener can often be done with a few basic troubleshooting steps. By identifying the problem, checking power and connections, inspecting the remote control, adjusting the safety sensors, lubricating moving parts, examining the trolley and drive belt/chain, and considering a reset, you can often restore your garage door opener’s functionality. Remember to prioritize safety, consult the manufacturer’s instructions, and seek professional help if needed. With these guidelines, you can save time and money by resolving common garage door opener problems on your own.

MF Solutions, Inc

9118 Elmwood Dr, Niles, IL 60714

302 Cherrywood Rd Buffalo Grove, IL 60089

224-434-1780

How to Manually Close Garage Door-Dynamo Overhead Garage Doors

Closing a Garage Door Repair Services manually is an essential skill to have in case of power outages or mechanical failures. While most garage doors are equipped with an automatic opener, understanding the manual operation method ensures that you can still secure your garage and protect your belongings.

In this guide, we will provide a step-by-step explanation on how to manually close a garage door.

Before We Begin: Before attempting to close your garage door manually, it is crucial to ensure your safety and the safety of others. Follow these precautions:

  1. Ensure there are no objects or obstructions in the garage door’s path.
  2. Keep children and pets away from the door while you are operating it manually.
  3. Familiarize yourself with the components of your garage door system, including the emergency release cord, springs, and track.

Step 1: Identify the Emergency Release Cord: The emergency release cord is a red rope or handle hanging from the garage door opener rail. It is usually located near the center of the garage door or on the side. Locate and grasp the emergency release cord firmly.

Step 2: Disengage the Garage Door Opener: Gently pull down on the emergency release cord to disengage the garage door opener mechanism. This action separates the opener from the door, allowing you to operate it manually.

Step 3: Check the Balance and Ease of Movement: Manually lift the garage door about halfway and release it. A properly balanced door should remain in place. If the door falls or rises, it may indicate a balance issue that requires professional attention. Additionally, ensure the door moves smoothly along the tracks without any resistance.

Step 4: Secure the Door: To prevent the door from reopening unexpectedly, secure it using a locking mechanism, if available. Some doors have built-in locks, while others may require using a padlock or bolt to secure the door in the closed position. Consult your garage door’s manual for specific instructions on locking mechanisms.

Step 5: Close the Garage Door: Position yourself at the bottom of the door, firmly grasp it with both hands, and lift it while applying even pressure. Be mindful of the weight of the door, as it can be heavy. Use your legs to provide strength while lifting. Continue lifting until the door is fully closed.

Step 6: Verify the Door’s Closure: Inspect the bottom of the door and ensure that it is securely closed against the ground. Check the sides and top of the door as well to make sure it is aligned correctly.

Step 7: Reengage the Garage Door Opener: Once power is restored or the issue is resolved, you will need to reengage the garage door opener. To do so, simply pull the emergency release cord towards the opener rail until you hear a clicking sound. This signifies that the opener is reconnected to the door.

Conclusion: Knowing how to manually close your Garage Door Repair Services is a valuable skill that ensures you can secure your garage and protect your belongings during power outages or when the automatic opener malfunctions. Remember to follow the safety precautions outlined in this guide and consult your garage door’s manual for any specific instructions. With these steps in mind, you can confidently handle manual operation and keep your garage secure.

Dynamo Overhead Garage Doors

Based in Conroe, TX

1-832-270-3373

How to Improve Garage Door Security-CCM Overhead Doors

Garage Door Repair security is a crucial aspect of overall home safety. Given that garages often house valuable possessions like vehicles, tools, and equipment, it’s essential to take proactive measures to protect them from theft and unauthorized access.

In this guide, we will discuss various ways to improve garage door security effectively. By implementing these measures, you can enhance the safety of your garage and provide peace of mind for yourself and your family.

  1. Invest in a High-Quality Garage Door: Start by ensuring that your garage door is made of sturdy materials such as steel or solid wood. These materials offer better resistance to forced entry compared to lightweight alternatives like aluminum or hollow-core doors. Additionally, consider choosing a door with reinforced panels and secure locks. Consult with a professional garage door installer to determine the most secure option that suits your budget and requirements.
  2. Install a Garage Door Opener with Rolling Code Technology: A rolling code technology-based opener enhances security by generating a new access code each time the door is operated. This prevents hackers from intercepting the code and gaining unauthorized access. Ensure your opener has this feature and periodically change the access code to minimize the risk of code theft.
  3. Strengthen Door Hardware: Reinforce the weak points of your garage door by upgrading the hardware. Install heavy-duty metal plates or bars to reinforce the area surrounding the lock. Additionally, use longer screws to secure hinges, strike plates, and other components, making it harder for burglars to force the door open.
  4. Install Security Cameras and Motion Sensor Lights: Installing security cameras and motion sensor lights in and around your garage is an effective deterrent against burglars. Visible cameras act as a deterrent, while motion sensor lights illuminate the area when someone approaches, discouraging unauthorized individuals from attempting a break-in. Ensure the cameras cover all entry points and use a surveillance system that allows remote monitoring.
  5. Implement a Garage Door Alarm System: Consider installing an alarm system specifically designed for garage doors. These systems can detect forced entry attempts, unauthorized tampering, or unusual vibrations. When triggered, they emit a loud sound, alerting you and nearby neighbors to the potential threat. Some advanced systems can also send alerts to your smartphone, allowing you to take immediate action.
  6. Reinforce Windows and Use Window Treatments: Garage door windows are vulnerable points that burglars can exploit. Reinforce the windows by adding security film, shatterproof glass, or window bars. Alternatively, use window treatments like curtains or blinds to prevent outsiders from seeing the contents of your garage, reducing the appeal for potential burglars.
  7. Secure Side and Back Doors: While focusing on the garage door itself, don’t overlook the security of side and back doors that provide access to the garage. Install solid doors made of robust materials, reinforce the frames, and use high-quality deadbolts or smart locks. Ensure these doors are well-lit and visible from the street to deter intruders.
  8. Practice Good Security Habits: No matter how secure your garage door is, it’s important to practice good security habits. Always lock your garage door when not in use, even if you’re at home. Keep the garage door opener remote out of sight and consider using a keychain remote instead of leaving it in your vehicle. Additionally, avoid leaving valuable items in plain sight within the garage, as this can attract unwanted attention.

Conclusion: By implementing these security measures, you can significantly improve the safety and security of your Garage Door Repair. Remember that no security system is entirely foolproof, but taking these steps will greatly reduce the risk of burglary and unauthorized access. Stay vigilant, maintain good security practices, and consult with professionals for expert advice to ensure your garage remains a safe and secure space for your belongings.

CCM Overhead Doors

1000 NW 80th St, Oklahoma City, OK 73114, United States

1-405-563-8982

Page 1 of 2

Powered by WordPress & Theme by Anders Norén